前端工具 - 模块化的由来
前端模块化要解决哪些问题?
# 发展历程
在早期的前端开发中,并没有模块化的概念。
甚至在 IE6 以前,浏览器还没有 js 引擎,
早期的 js 文件非常简单,一般通过 script 直接引入
或者直接在 script 标签中直接编写 js 代码,也就是采用
单文件进行管理 js 代码。
随着互联网的发展,前端业务逐渐变得复杂,使用 js 的情景越来越多, 业务量的增长也让 js 的代码量水涨船高,此时,还采用单个文件来维护 js 代码的话,一来不方便维护,同时用户请求的时间也随之变长了。再者, 采用单文件的方式不利于代码的复用。
于是,就有了一种新的文件管理方式,就是不同的页面对应不同的 js 文件, 即,以页面为基准将 js 代码划分为不同的脚本块。这是早期的模块化思维。
为了实现代码的复用,于是就出现了把公共的代码放在同一个文件中, 不同的页面按需引用。但是,这种做法也有一点问题,考虑下面的代码:
// common1
function func1() {}
function func2() {}
2
3
作为公共的脚本,不同页面可以引用改文件。但是问题在于如果 A 页面
只需要用到改公共脚本中的 func1,这种引用发生或导致 A 页面
导入许多无用的东西,这显然不合理。也就是说,采用以页面为基准的
引用方式存在不足了。
于是就有了以程序为基准的脚本划分方式。
# 模块化初探
我们把一个程序划分为多个模块(模块 A,模块 B,和模块 C)进行管理。
// ./module-a.js
var a = [1, 2, 3, 4]

// ./module-b.js
var b = {
  name: 'module b',
}

// ./module-c.js
var c = a.map(item => item * item)

// ./main.js
console.log(`a = ${JSON.stringify(a)}`)
console.log(`b = ${JSON.stringify(b)}`)
console.log(`c = ${JSON.stringify(c)}`)
2
3
4
5
6
7
8
9
10
11
12
13
14
15
<!-- index.html -->
<script src="./module-a.js"></script>
<script src="./module-b.js"></script>
<script src="./module-c.js"></script>
<script src="./main.js"></script>
2
3
4
5
我们“定义”了三个模块,然后在 main.js 使用了这些模块。
其次,模块与模块之间存在引用,即 module-c.js 引用了 module-a.js。
然后,我们还需要在相应页面 index.html 中导入主程序。
这种模块化的方式也是很有问题的,一来由于变量是定义在全局作用域上,
污染了全局作用域。再者是这种模块化没能解决模块之间的依赖问题。
也就是,我们根本不知道当前模块引用了哪些其他模块(例如:在 module-c 中,
我们引用了 module-a,但单从代码上看我们根本不得而知)。同时,当我们
使用模块的时候,我们还需要按照模块引用的顺序对模块进行导入,如果顺序不对
会导致整个程序运行奔溃(例如:我们在 index.html 中现导入 main.js 再
导入其他模块,显然程序会奔溃)。
回到最初的问题:模块化究竟要解决什么问题?这里可以给出答案。 模块化需要解决:
- 全局污染。
- 模块污染。
为了解决上述的两个问题,引入了闭包来实现模块化。
利用闭包延长函数的作用域的同时,我们可以解决全局污染的问题。
// ./module-a.js
var moduleA = (function () {
  var a = [1, 2, 3, 4]

  return {
    a: a,
  }
})()

// ./module-b.js
var moduleB = (function () {
  var b = {
    name: 'module b',
  }

  return {
    b: b,
  }
})()

// ./module-c.js
var moduleC = (function () {
  var c = moduleA.a.map(item => item * item)
  return {
    c: c,
  }
})()

// ./main.js
var a = moduleA.a
var b = moduleB.b
var c = moduleC.c

console.log(`module closure a = ${JSON.stringify(a)}`)
console.log(`module closure b = ${JSON.stringify(b)}`)
console.log(`module closure c = ${JSON.stringify(c)}`)
2
3
4
5
6
7
8
9
10
11
12
13
14
15
16
17
18
19
20
21
22
23
24
25
26
27
28
29
30
31
32
33
34
35
36
虽然我们解决了避免全局污染的问题,还有一个模块之间的相互依赖
还没有解决,下面就来解决这个问题。我们的程序中,只有 module-c 和
主程序引用
其他模块,我们对这两个文件进行修改。
// ./module-c.js
var moduleC = (function (moduleA) {
  var c = moduleA.a.map(item => item * item)
  return {
    c: c,
  }
})(moduleA)

// ./main.js
;(function (moduleA, moduleB, moduleC) {
  var a = moduleA.a
  var b = moduleB.b
  var c = moduleC.c

  console.log(`module closure a = ${JSON.stringify(a)}`)
  console.log(`module closure b = ${JSON.stringify(b)}`)
  console.log(`module closure c = ${JSON.stringify(c)}`)
})(moduleA, moduleB, moduleC)
2
3
4
5
6
7
8
9
10
11
12
13
14
15
16
17
18
我们采用模块注入的方式,将模块 A 注入到模块 C 中,从而实现模块之间的依赖关系。
# commonJS
nodejs 中提供 require 和 module.exports 进行模块化管理。
但是,nodejs 提供的模块化管理方式只能运行在 node 环境上,想要运行 在浏览器上的话,还需要 webpack 提供支持。
commonJS 所提供的模块化管理方式具有如下特点:
- 同步进行。
- 只要引用就进行实例化。
- 缓存模块。每引用一个模块就对引用的模块进行缓存。
# AMD (Asynchronous Module Definition)
之所以会有 AMD,是因为 commonJS 需要在 node 环境上才能运行。
AMD 的出现就是为了可以在浏览器上直接使用类似于 require 的模块化
管理方式。
与 commonJS 的模块化不同,AMD 采用的是异步模块的管理方式。 其使用方法如下:
先引入
require.js。AMD 需要借助require.js实现。定义模块和使用模块。
// 定义模块。
define('moduleName', ['dependency1', 'dependency2', ...], function factory() {});

// 使用模块。
require(['dependency1', 'dependency2', ...], function (inject1, inject2, ...) {})
1
2
3
4
5
还是用刚才的示例,不过这次我们使用 AMD 实现。
// ./module-a.js
define('module-a', function () {
  var a = [1, 2, 3, 4, 5]
  return {
    a: a,
  }
})

// ./module-b.js
define('module-b', function () {
  var b = {
    name: 'module b',
  }
  return {
    b: b,
  }
})

// ./module-c.js
define('module-c', ['module-a'], function (moduleA) {
  var c = moduleA.a.map(function (item) {
    return item * item
  })
  return {
    c: c,
  }
})

// ./main.js
require(['module-a', 'module-b', 'module-c'], function (
  moduleA,
  moduleB,
  moduleC,
) {
  var a = moduleA.a
  var b = moduleB.b
  var c = moduleC.c
  console.log(`commonjs a = ${JSON.stringify(a)}`)
  console.log(`commonjs b = ${JSON.stringify(b)}`)
  console.log(`commonjs c = ${JSON.stringify(c)}`)
})
2
3
4
5
6
7
8
9
10
11
12
13
14
15
16
17
18
19
20
21
22
23
24
25
26
27
28
29
30
31
32
33
34
35
36
37
38
39
40
41
<script src="./require.js"></script>
<script src="./main.js"></script>
2
同时,require 也提供了自定义模块路径的方式。具体使用方法如下:
require.config({paths: { moduleName: 'modulePath' }})
通过 commonJS 和 amd 的模块化管理方式,我们可以解决模块之间的相互依赖
关系的管理,所以,在 index.html 中,我们只需要引入 main.js 而不需要
在引用其他 js 文文件。模块之间的相互依赖关系由它们帮我们进行管理。
amd 采用的是异步加载的方式,而且在使用模块时先将依赖到的模块进行加载,
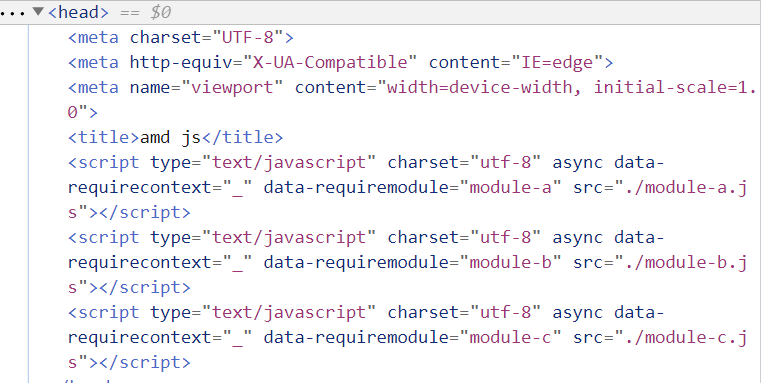
加载完成后才会执行回调函数(这种方式也叫前置依赖)。来看通过 amd 使用模块后的 html 代码:

可以看到,amd 会在 head 中先加载依赖,而且是采用 async 的方式进行加载的。
通过回调函数的方式,保证了异步加载模块的顺序问题。
# CMD (Common Module Definition)
CMD 的实现需要借助 sea.js。
其特点是:
- 依赖就近。
- 按需加载。
使用方式如下:
// 1. 定义。
define(function (require, exports, module) {})
// 2. 使用
seajs.use(['modulePath'], function (moduleA, moduleB, moduleC) {})
2
3
4
# es6 模块化
ECMA 在 es6 中正式给出了 js 模块化的管理。
通过采用 import 和 export 的方式来实现模块的导入
与导出。只要 js 文件中使用到了 import 和 export,
我们就可以认为这是一个模块。
下面让我们将之前的示例用 es6 提供的模块化重新编写一下。
// ./module-a.js
var a = [1, 2, 3, 4, 5]

export { a }

// ./module-b.js
var a = [1, 2, 3, 4, 5]

export { a }

// ./module-c.js
import { a } from './module-a.js'
var c = a.map(function (item) {
  return item * item
})

export { c }
2
3
4
5
6
7
8
9
10
11
12
13
14
15
16
17
使用 es6 进行模块管理还需要浏览器支持,所以在引用时,
需要指明改文件类型为 module。
<script src="./main.js" type="module"></script>
可以看到 es6 给我们提供的模块化管理,实现起来其代码是 非常简洁的。
# es6 模块化与 commonJS 的区别
- commonJS 模块输出的是一个值拷贝(值得注意的是,这种拷贝是浅拷贝), 而 es6 模块输出的是值的引用。
- commonJS 是运行时加载,而 es6 是编译输出接口。
要想解释第一点,我们来考虑如下的代码:
// common js 实现模块化
// ./commonjs-module-a.js
var a = 0

setTimeout(() => {
  a++
}, 0)

module.exports = {
  a,
}

// commonjs-main.js
var moduleA = require('./commonjs-module-a')

setTimeout(() => {
  console.log('commonjs a = ', moduleA.a) // commonjs a = 0
}, 1000)

// es6 实现模块化
// ./es6-module-a.js
var a = 0

setTimeout(() => {
  a++
}, 0)

export { a }

import { a } from './es6-module-a.js'

setTimeout(() => {
  console.log('es6 a = ', a) // es6 a = 1;
}, 1000)
2
3
4
5
6
7
8
9
10
11
12
13
14
15
16
17
18
19
20
21
22
23
24
25
26
27
28
29
30
31
32
33
34
通过输出可以验证,es6 和 commonJS 的对模块的定义是不同的。
对于第二点,是因为 commonJS 加载的模块是一个对象,对象 只有在脚本运行完成后才会生成。而 es6 模块并不是对象,它只是 对外提供一种静态的定义,在代码的编译解析阶段就生成
# es6 与 commonJS 处理循环引用
# commonJS
在 commonJS 中,每一个模块就是一个实例。 cjs 会在
实例化模块的时候,设置一个标识位 loaded = false,
当模块加载完成后,loaded = true。
如果在后面加载过程中,引用到别的模块,cjs 引擎会去加载 引用的模块。如果遇到循环引用的时候,cjs 会忽略改模块的 加载,继续执行当前模块。所以,在 cjs 中如果遇到循环引用 的时候,我们只能拿到 前一个模块已经加载完成的数据。 来看下面的代码:
// ./cjs-module-a.js
exports.done = false

var b = require('./cjs-module-b')
// moduleA: b.done =  true
console.log('moduleA: b.done = ', b.done)

exports.done = true
// moduleA: module has been loaded, loaded =  true
console.log('moduleA: module has been loaded, loaded = ', exports.done)

// ./cjs-module-b.js
exports.done = false

var a = require('./cjs-module-a')
// moduleB: a.done =  false
console.log('moduleB: a.done = ', a.done)

exports.done = true
// moduleB: module has been loaded, loaded =  true
console.log('moduleB: module has been loaded, loaded = ', exports.done)

// ./cjs-main.js
var a = require('./cjs-module-a')
var b = require('./cjs-module-b')

console.log('main: a.done = ', a.done)
console.log('main: b.done = ', b.done)
2
3
4
5
6
7
8
9
10
11
12
13
14
15
16
17
18
19
20
21
22
23
24
25
26
27
28

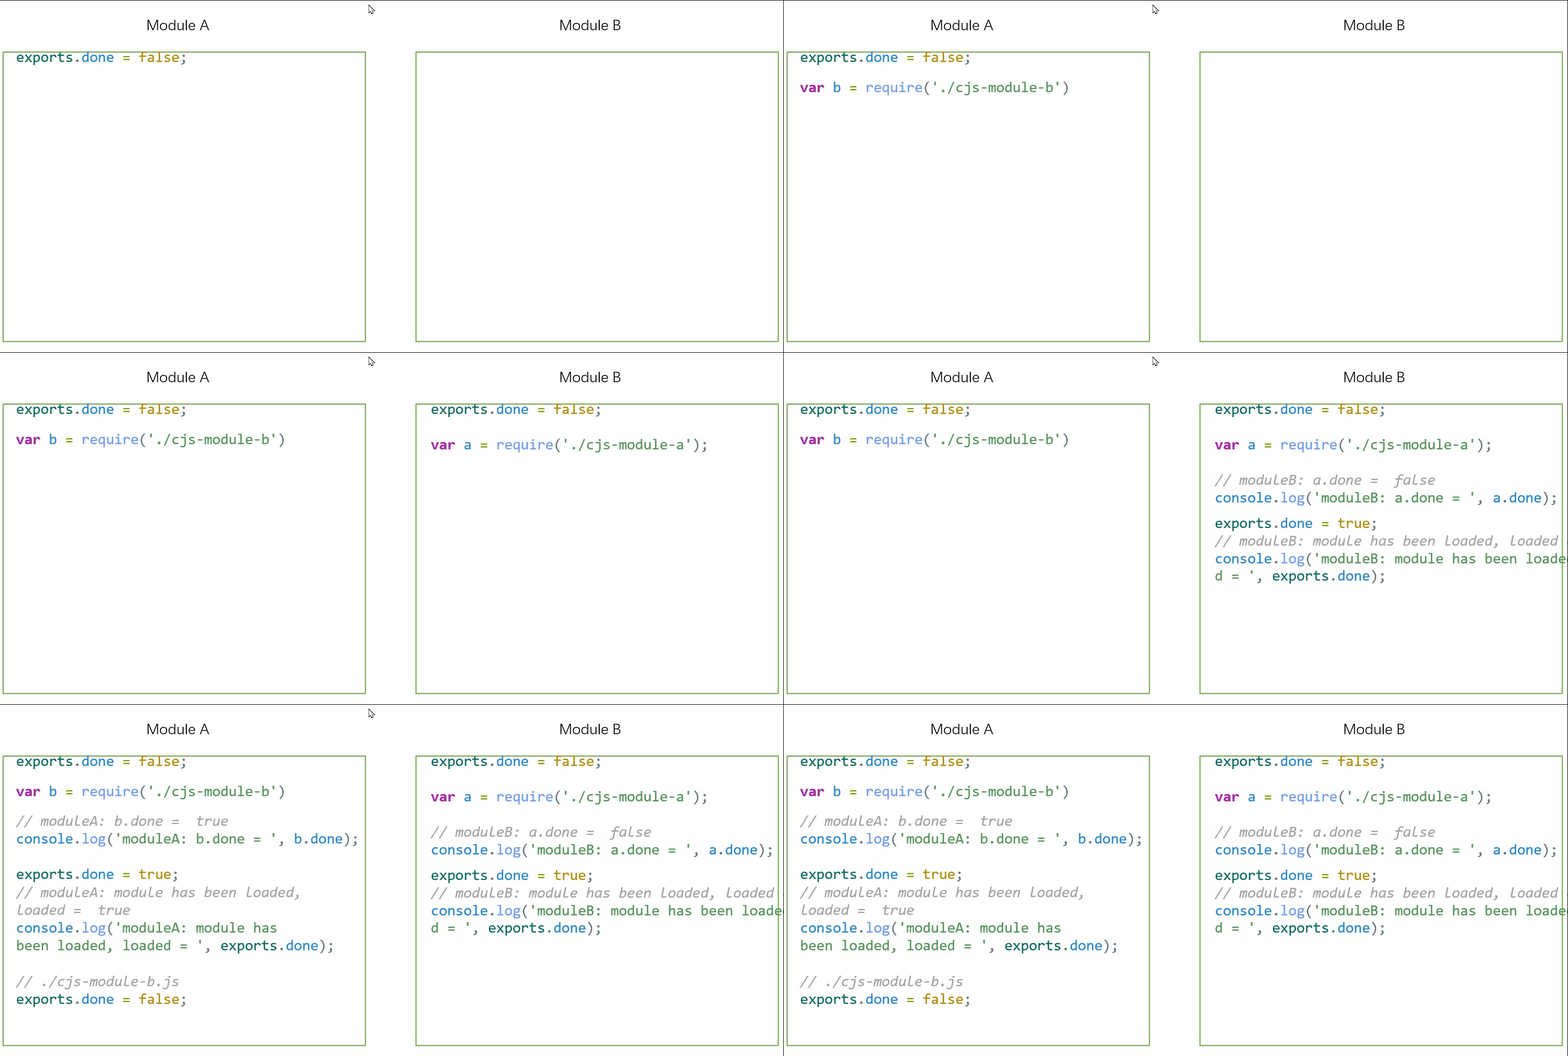
从动画我们可以理解 cjs 对模块的加载方式。
首先,加载 module-a,遇到 require('module-b') 时,
加载 module-b。
加载 module-b 时,又引用了 require('module-a'),
也就是循环引用了,
这时候 cjs 引擎不会再去加载 module-a,但是,在 module-b
中我们可以使用到 module-a 中已经加载的部分,这就是为什么
打印出 moduleB: a.done = false。加载完 module-b 后,
继续加载 module-a,所以输出 moduleA: b.done = true。
# es6
es6 的加载过程与 cjs 类似,但是由于 es6 的模块化采用的是 数据的引用方式,所以确保了数据是最新的,但这样作也可能带来 一定的坏处,也就在循环引用的时候会出现引用错误。 来看下面的代码:
// ./module-a.js
import { done as BDone } from './es6-module-b.js'
console.log('moduleA: start loading...')

export let done = false
done = true
console.log('moduleA: moduleA.done = ', done)
console.log('moduleA: moduleB.done = ', BDone)

// ./module-a.js
import { done as ADone } from './es6-module-a.js'
export let done = false

console.log('moduleB: start loading...')
// Uncaught ReferenceError: Cannot access 'ADone' before initialization
console.log('moduleB: ADone = ', ADone)

done = true
console.log('moduleB: b.done = ', done)
2
3
4
5
6
7
8
9
10
11
12
13
14
15
16
17
18
19
上面代码执行时会抛出一个 ReferenceError,这是因为
module-b 中在执行的过程中,module-a 还没有声明
变量 done,这就就像 ts 中的接口,我们知道有这个值
的存在,但是,这个值是否定义了还得看具体的运行环境。
我们可以将变量该换成函数的方式来解决这个问题。
这是因为函数具有提升作用,也就是在 module-a 中
的 import {} from './module-b.js 执行之前,
改函数就定义好了。
// ./module-a.js
import { done as BDone } from './es6-module-b.js'
console.log('moduleA: start loading...')

// export let done = false;
export function done() {
  return false
}
// done = true;
console.log('moduleA: moduleA.done = ', done())
console.log('moduleA: moduleB.done = ', BDone)

// ./module-b.js
import { done as ADone } from './es6-module-a.js'
export let done = false

console.log('moduleB: start loading...')
console.log('moduleB: ADone = ', ADone())

done = true
console.log('moduleB: b.done = ', done)
2
3
4
5
6
7
8
9
10
11
12
13
14
15
16
17
18
19
20
21
同样的道理,我们也不能使用箭头函数,因为箭头函数也不具备 变量提升的作用。
