前端框架 - 关于 vue 的常见问题
ru shui 2021-06-22 About 13 min
# 关于 MVVM 原理的理解
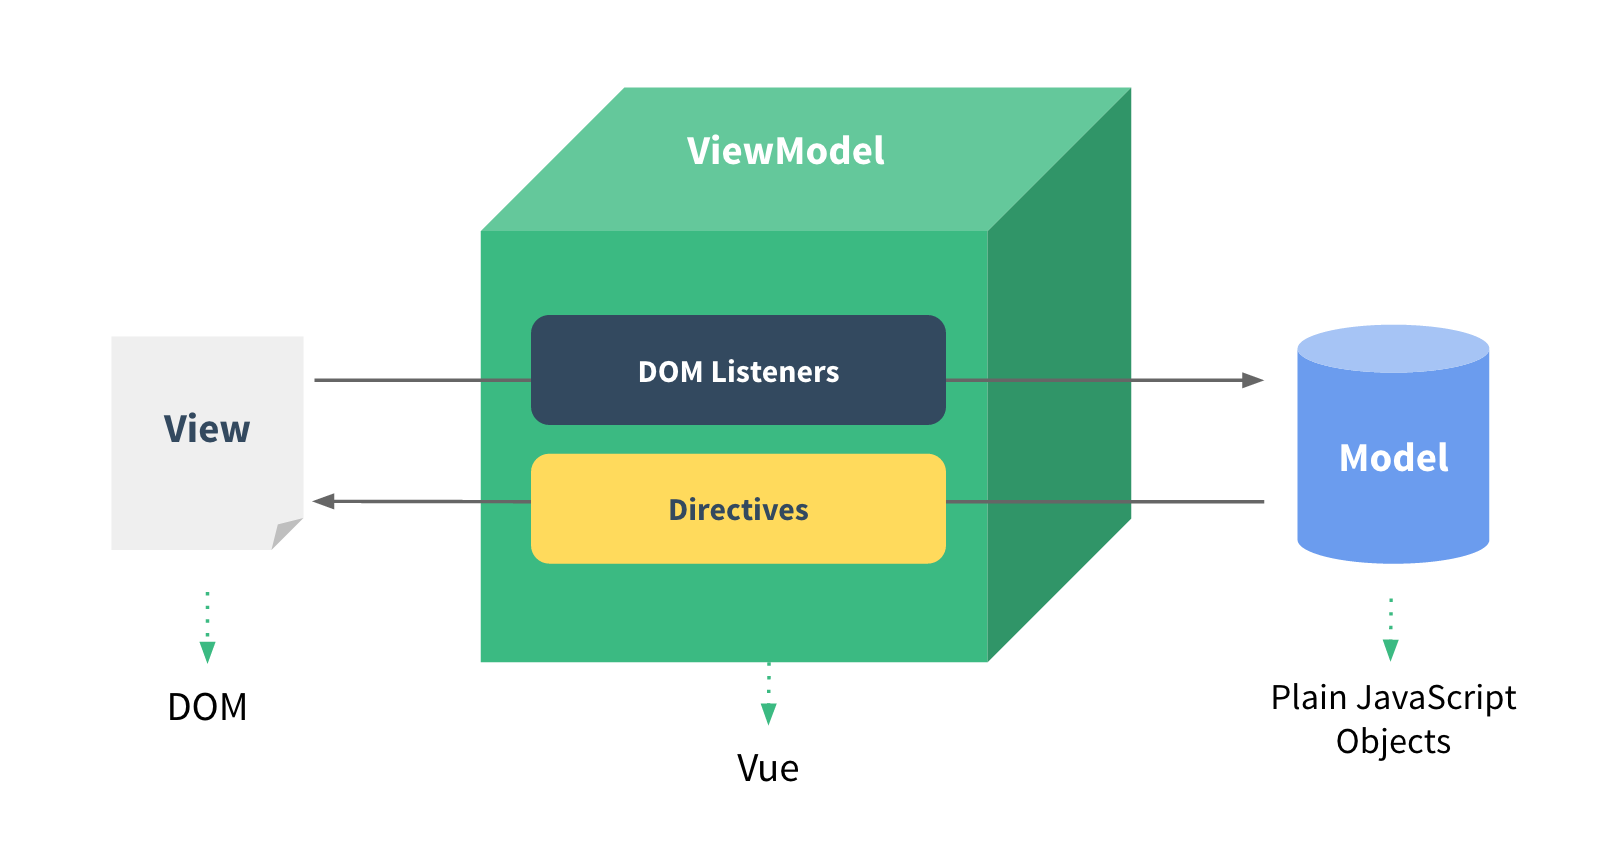
MVVM 将数据层和视图层分离开,使用一个中间的控制器将视图层 和数据层连接起来,这个控制器称之为 ViewModel,数据层 称之为 Model 而视图层称之为 View。
# ViewModel
ViewModel 作为 View 和 Model 的连接体。每当 Model 发生变化的时候就会去通知 相应的 View 进行更新;而当 View 相应(例如:UI 点击事件等)操作数据 的时候,ViewModel 又会将其反作用到对应的 Model。
vue 并没有完全遵守 MVVM 模型,它更关注于 ViewModel 的实现。 在 vue 中每一个 Vue 实例都算是一个 ViewModel。
# View
视图,可以是真实的 DOM。
在 vue 中,真实 DOM 由 Vue 实例进行管理,DOM 元素被封装到
实例的 $el 中,我们基本上不需要直接操作 DOM 元素,我们可以
通过 vue 提供的 API 接口对 DOM 元素进行操作。
# model
可以称作数据层。在 vue 中,model 是一个被略微修改过的纯 javascript 对象。
之所以是被略微修改,是由于 vue 为了实现响应式采用了数据劫持的
方式对原有的对象进行修改。然后将数据封装到实例的 $data 上。
# 响应式数据的原理
vue2 实现数据响应式的核心原理是通过 Object.defineProperty
对数据进行拦截而实现的。
vue2 在初始化数据的时候,会使用 Object.defineProperty 对数据
重新定义。当用户获取或者设置数据的时候会触发相应的 getter 和
setter,所以 vue 会在 getter 中收集依赖,在 setter 中
实现数据的响应化更新。
响应式数据采用了观察者模式实现的。在 getter 中订阅(也就
是依赖收集),在 setter 使用 notify 通知视图更新。
整个过程(针对对象)可以大致描述为如下的图:

vue 在创建实例的时候,会调用 initMixin,在 initMixin 中
会对数据进行代理和初始化(initData)。在初始化数据的时候,
会通过 Observer 对当前数据进行观察,并收集依赖。当数据为对象
时,会调用 Observer.prototype.walk 遍历对象里面的所有 key,
然后调用 defineReactive 实现响应式。而 defineReactive 实现
响应式的真正核心代码是通过 Object.defineProperty 实现的。
来看 defineReactive 中的部分代码:
function defineReactive(/* ... */) {
  // statement...

  Object.defineProperty(obj, key, {
    enumerable: true,
    configurable: true,
    get: function reactiveGetter() {
      const value = getter ? getter.call(obj) : val
      if (Dep.target) {
        // ⬇⬇⬇⬇⬇⬇⬇⬇⬇⬇⬇⬇⬇⬇⬇⬇⬇⬇⬇⬇⬇⬇⬇⬇⬇⬇
        dep.depend()
        if (childOb) {
          childOb.dep.depend()
          if (Array.isArray(value)) {
            dependArray(value)
          }
        }
      }
      return value
    },
    set: function reactiveSetter(newVal) {
      const value = getter ? getter.call(obj) : val
      /* eslint-disable no-self-compare */
      if (newVal === value || (newVal !== newVal && value !== value)) {
        return
      }
      /* eslint-enable no-self-compare */
      if (process.env.NODE_ENV !== 'production' && customSetter) {
        customSetter()
      }
      // #7981: for accessor properties without setter
      if (getter && !setter) return
      if (setter) {
        setter.call(obj, newVal)
      } else {
        val = newVal
      }
      childOb = !shallow && observe(newVal)
      // ⬇⬇⬇⬇⬇⬇⬇⬇⬇⬇⬇⬇⬇⬇⬇⬇⬇⬇⬇⬇⬇⬇⬇⬇⬇⬇
      dep.notify()
    },
  })
}
1
2
3
4
5
6
7
8
9
10
11
12
13
14
15
16
17
18
19
20
21
22
23
24
25
26
27
28
29
30
31
32
33
34
35
36
37
38
39
40
41
42
43
2
3
4
5
6
7
8
9
10
11
12
13
14
15
16
17
18
19
20
21
22
23
24
25
26
27
28
29
30
31
32
33
34
35
36
37
38
39
40
41
42
43
在 Object.defineProperty 中的 getter 通过调
用 dep.depend() 收集依赖。在 setter 中通过调
用 dep.notify 通知视图响应式更新。
# Vue 是如何检测数组的变化
数组没办法像对象那样直接通过 defineProperty 进行数据拦截,
因为使用做的话,使用数组的 shift, unshift, append 等
这些修改数组的方法无法触发响应式。所以 vue 对数组进行额外的
操作。

前面实现响应式的过程与对象类似。但是在 new Observer 中
vue 会修改当前数组原型上的方法(是 protoAugment
还是 copyAgument 取决于 '__proto__' in {}),
,内部还是会调用 dep.notify()。下面是 vue 中如何对数组
的方法进行修改的代码:
odsToPatch = ['push', 'pop', 'shift', 'unshift', 'splice', 'sort', 'reverse']

/**
 * Intercept mutating methods and emit events
 */
methodsToPatch.forEach(function (method) {
  // cache original method
  const original = arrayProto[method]
  def(arrayMethods, method, function mutator(...args) {
    const result = original.apply(this, args)
    const ob = this.__ob__
    let inserted
    switch (method) {
      case 'push':
      case 'unshift':
        inserted = args
        break
      case 'splice':
        inserted = args.slice(2)
        break
    }
    if (inserted) ob.observeArray(inserted)
    // notify change
    // ⬇⬇⬇⬇⬇⬇⬇⬇⬇⬇⬇⬇⬇⬇
    ob.dep.notify()
    return result
  })
})
1
2
3
4
5
6
7
8
9
10
11
12
13
14
15
16
17
18
19
20
21
22
23
24
25
26
27
28
2
3
4
5
6
7
8
9
10
11
12
13
14
15
16
17
18
19
20
21
22
23
24
25
26
27
28
同时,会遍历数组中的数据,对里面的每一项进行观察。
# 为何 Vue 采用异步渲染
采用异步渲染主要是出于性能考虑。Vue 是组件级更新,不可能单个数据
发生变化就立马更新视图,而是会先将发生变化的数据对应的 Watcher
放入到一个队列中,等当前组件数据更新完毕,调用 nextTick 实现
页面更新。

// ./schedule.js
export function queueWatcher(watcher: Watcher) {
  const id = watcher.id
  if (has[id] == null) {
    has[id] = true
    if (!flushing) {
      // ⬇⬇⬇⬇⬇⬇⬇⬇⬇⬇⬇⬇⬇⬇⬇⬇
      queue.push(watcher)
    } else {
      // if already flushing, splice the watcher based on its id
      // if already past its id, it will be run next immediately.
      let i = queue.length - 1
      while (i > index && queue[i].id > watcher.id) {
        i--
      }
      queue.splice(i + 1, 0, watcher)
    }
    // queue the flush
    if (!waiting) {
      waiting = true

      if (process.env.NODE_ENV !== 'production' && !config.async) {
        flushSchedulerQueue()
        return
      }
      // ⬇⬇⬇⬇⬇⬇⬇⬇⬇⬇⬇⬇⬇⬇⬇⬇
      nextTick(flushSchedulerQueue)
    }
  }
}
1
2
3
4
5
6
7
8
9
10
11
12
13
14
15
16
17
18
19
20
21
22
23
24
25
26
27
28
29
30
2
3
4
5
6
7
8
9
10
11
12
13
14
15
16
17
18
19
20
21
22
23
24
25
26
27
28
29
30
# nextTick 的实现原理
# Vue 中的 Computed 的特点
# Watch 中的 deep: true 是如何实现的
# Vue 组件的声明周期

beforeCreate: 在 vue 实例创建之后,数据观测( data observer) 之前被调用。created: 数据观测 ( data observer ) 和计算属性、方法等执行完成 ,watch / event 事件回调也初始化完成,但此时并没有$el。beforeMounted: 挂载实例之前的生命函数钩子,此时render函数 等初次调用。mounted: 完成$el的创建并挂载到 DOM 上。beforeUpdate: 数据更新时调用,发生在虚拟 DOM 重新 渲染和打补丁之前。updated: 由于数据更新导致虚拟 DOM 重新渲染和打补丁。beforeDestroy: 在实例被销毁之前调用的一些清理工作。destroy: 销毁实例。实例上的所有数据会解除绑定,所有的事件监听器 会被移除。
每个生命周期内部可以做的事情:
create: 实例已经创建完成,可以拿到实例上面的数据, 可以发送资源的请求。mounted: 实例已经完成挂载,可以进行 DOM 操作。beforeUpdate: 在数据渲染后更新操作之前,可以进一步修改 状态。updated: 可以执行更新后的 DOM 操作。大部分情况下,避免 在这个阶段操作 DOM 元素。destroy: 可以执行一些优化操作,例如:清空定时器,解除 事件绑定从而避免内存泄露。
# ajax 请求应该放在哪个生命周期中
可以放在 create 或者是 mounted 中。
- 放在
create中的话无法拿到 DOM 元素,但是其发送请求的优先级 会高一点。 - 放在
mounted中的话可以拿到渲染后的 DOM 元素。
但是,对于服务器渲染是没有 DOM 的概念。所以,可以统一使用浏览器
时在 mounted 发送请求;在服务器渲染的时候,在 create 中
请求数据。
# 什么时候要使用 beforeDestroy
# Vue 中模板编译的原理
# v-if 和 v-show 的区别
# 为什么 v-for 和 v-if 不能连用
# 用 vnode 来描述一个 DOM 结构
# diff 算法的时间复杂度
评级比较
# 简述 Vue 中的 diff 算法
# v-for 中为什么要用 key
不带 key 情况下,默认的 key 是 undefined。
vue 在执行 diff 算法的时候,由于两个 key
相同,于是会执行 patchVnode 打补丁对节点进行复用。
对于一些 无状态的数据循环来说,不使用 key 可以提高
运行的效率。但是对于那些使用到状态的循环而言,如果不使用
key 的话,vue 复用子元素可能会出现一些 bug。
使用 key 会影响性能,如果操作了元素,vue 在 打补丁的时候
找不到可以复用的 vnode,则需要将旧的 vnode 删除,同时
操作 dom。
事实上,加上 key 对于性能的影响并不大,出于安全考虑,v-for 中
最好使用 key。
其次,key 最好是唯一的标识,如果简单地使用索引作为 key 的话,vue 在复用子元素的时候也可能出现 bug。
# 描述组件渲染和更新过程
# 组件中的 data 为什么是一个函数
# Vue 中事件绑定的原理
vue 中的事件绑定采用了两种方式:
- 原生事件绑定。
- 组件事件绑定。
当我们在 html 元素上绑定事件的时候,vue 最终会通过 addEventListener 的
方式为 DOM 元素绑定事件。
对于组件的事件绑定,vue 是通过使用自己的事件管理实现的(采用的是发布订阅模式)。
考虑下面的例子:
const compiler = require('vue-template-compiler')

let r1 = compiler.compile('<div @click="fn()"></div>')
let r2 = compiler.compile(
  '<my-component @click="fn()" @click.native="fn()"></my-component>',
)

console.log(r1.render)
console.log(r2.render)
/*
with(this){return _c('div',{on:{"click":function($event){return fn()}}})}
with(this){return _c('my-component',{on:{"click":function($event){return fn()}},nativeOn:{"click":function($event){return fn()}}})}
*/
1
2
3
4
5
6
7
8
9
10
11
12
13
2
3
4
5
6
7
8
9
10
11
12
13
# v-model 的实现原理以及如何定义 v-model
v-model 对于组件默认情况下就是 value 和 input 的语法糖。
来看源码的实现:
function transformModel(options, data: any) {
  const prop = (options.model && options.model.prop) || 'value'
  const event = (options.model && options.model.event) || 'input'
  ;(data.attrs || (data.attrs = {}))[prop] = data.model.value
  const on = data.on || (data.on = {})
  const existing = on[event]
  const callback = data.model.callback
  if (isDef(existing)) {
    if (
      Array.isArray(existing)
        ? existing.indexOf(callback) === -1
        : existing !== callback
    ) {
      on[event] = [callback].concat(existing)
    }
  } else {
    on[event] = callback
  }
}
1
2
3
4
5
6
7
8
9
10
11
12
13
14
15
16
17
18
19
2
3
4
5
6
7
8
9
10
11
12
13
14
15
16
17
18
19
通过上面的源码,我们也可以自定义组件的 v-model。
Vue.component('el-checkbox', {
  template: `<input type="checkbox" :checked="check"
@change="$emit('change',$event.target.checked)">`,
  model: {
    prop: 'check', // 更改默认的 value 的名字
    event: 'change', // 更改默认的方法名
  },
  props: {
    check: Boolean,
  },
})
1
2
3
4
5
6
7
8
9
10
11
2
3
4
5
6
7
8
9
10
11
对于原生 DOM 元素,vue 在编译时会根据不同的标签和 type 指定 value 和 event。
export default function model(
  el: ASTElement,
  dir: ASTDirective,
  _warn: Function,
): ?boolean {
  // statement...
  if (el.component) {
    genComponentModel(el, value, modifiers)
    // component v-model doesn't need extra runtime
    return false
  } else if (tag === 'select') {
    genSelect(el, value, modifiers)
  } else if (tag === 'input' && type === 'checkbox') {
    genCheckboxModel(el, value, modifiers)
  } else if (tag === 'input' && type === 'radio') {
    genRadioModel(el, value, modifiers)
  } else if (tag === 'input' || tag === 'textarea') {
    genDefaultModel(el, value, modifiers)
  } else if (!config.isReservedTag(tag)) {
    genComponentModel(el, value, modifiers)
    // component v-model doesn't need extra runtime
    return false
  } else if (process.env.NODE_ENV !== 'production') {
  }

  // ensure runtime directive metadata
  return true
}
1
2
3
4
5
6
7
8
9
10
11
12
13
14
15
16
17
18
19
20
21
22
23
24
25
26
27
28
2
3
4
5
6
7
8
9
10
11
12
13
14
15
16
17
18
19
20
21
22
23
24
25
26
27
28
# 跨组件通信
- 通过 Event Bus 实现。其核心原理还是
vue实例上的$emit和$on,通过$emit派发全局事件,通过$on监听全局事件。Vue.prototype.$bus = new Vue()1 - 使用
vuex实现状态管理。
# v-html 会导致哪些问题
存在安全性问题。例如:我们将输入框获取到的内容作为 v-html 的
输入,则用户完全可以通过输入框执行脚本。
<input type="text" v-model="msg" />
<div v-html="msg"></div>
1
2
2
鉴于此,不建议直接使用 v-html 接受用户的数据。
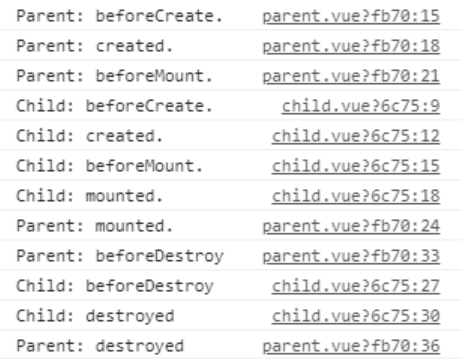
# Vue 父子组件生命周期的调用顺序
- 父组件在挂载之前如果发现有子组件的话,会递归创建子组件。
- 父组件在销毁之前,回去销毁子组件。
# Vue 组件是如何通信的
# 父传子
- 通过
props向子组件传递数据。
// parent.vue
<template>
<div class="parent">
  <h1>parent component</h1>
  <child :msg="'hello children'"/>
</div>
</template>

<script>
import child from '@/components/child'
export default {
components: {
  child,
}
}
</script>

// ----------------------
// child.vue

<template>
  <div class="child">
    <p>In child component: receive message {{ msg }}</p>
  </div>
</template>

<script>
export default {
  props: {
    msg: String,
  },
}
1
2
3
4
5
6
7
8
9
10
11
12
13
14
15
16
17
18
19
20
21
22
23
24
25
26
27
28
29
30
31
32
2
3
4
5
6
7
8
9
10
11
12
13
14
15
16
17
18
19
20
21
22
23
24
25
26
27
28
29
30
31
32
- 父组件通过
$children的方式获取子组件。 - 父组件通过
ref的方式获取子组件。 - 父组件通过
provide向子组件传送数据,子组件通过inject获取父组件传送过来的数据。
# 子组件向父组件传送数据
- 子组件通过
$emit的方式向父组件暴露一个事件, 父组件可以在子组件上监听事件的触发或者获取到子组件 通过$on的方式监听。
// child.vue
<template>
  <div class="child">
    <button @click="handleBtnClick">send message to parent</button>
  </div>
</template>

<script>
export default {
  props: {
    msg: String,
  },
  methods: {
    handleBtnClick() {
      this.$emit('sendMessageToParent', 'hello parent')
    },
  },
}
</script>

// ------------------------ // parent.vue
<template>
  <div class="parent">
    <h1>parent component</h1>
    <child @sendMessageToParent="onReceiveMessage" ref="child-ref" />
  </div>
</template>

<script>
import child from '@/components/child'
export default {
  components: {
    child,
  },
  methods: {
    onReceiveMessage(msg) {
      console.log('receive message from child: ', msg)
    },
  },
  mounted() {
    const child = this.$refs['child-ref']
    child.$on('sendMessageToParent', msg => {
      console.log('receive message from child: ', msg)
    })
  },
}
</script>
1
2
3
4
5
6
7
8
9
10
11
12
13
14
15
16
17
18
19
20
21
22
23
24
25
26
27
28
29
30
31
32
33
34
35
36
37
38
39
40
41
42
43
44
45
46
47
2
3
4
5
6
7
8
9
10
11
12
13
14
15
16
17
18
19
20
21
22
23
24
25
26
27
28
29
30
31
32
33
34
35
36
37
38
39
40
41
42
43
44
45
46
47
- 子组件通过
$parent的方式获取到父组件的实例。 - 子组件可以通过
$attrs获取父组件向子组件传送过来的数据, 通过$listeners获取父组件监听子组件的监听器。
# Vue 中相同逻辑如何抽离
可以使用 mixin() 向 vue 组件混入公共的逻辑。
但是缺点也是很明显的:每个组件莫名其妙多出来一些数据和方法。
Vue.mixin() 实现方式特别简单,就是通过调用其 mergeOptions 方法。
export function initMixin(Vue: GlobalAPI) {
  Vue.mixin = function (mixin: Object) {
    this.options = mergeOptions(this.options, mixin)
    return this
  }
}
1
2
3
4
5
6
2
3
4
5
6
合并的大概原理如下:
Vue.mixin({
  beforeCreate() {},
})
1
2
3
2
3
vue 会将 mixin 中的 hook 存入到一个队列中(头插)
,然后在 callHook 的时候会遍历队列,依次取出 hook 并执行。
/**
 * Hooks and props are merged as arrays.
 */
function mergeHook(
  parentVal: ?Array<Function>,
  childVal: ?Function | ?Array<Function>,
): ?Array<Function> {
  const res = childVal
    ? parentVal
      ? parentVal.concat(childVal)
      : Array.isArray(childVal)
      ? childVal
      : [childVal]
    : parentVal
  return res ? dedupeHooks(res) : res
}
1
2
3
4
5
6
7
8
9
10
11
12
13
14
15
16
2
3
4
5
6
7
8
9
10
11
12
13
14
15
16
核心逻辑是 parentVal.concat(childVAl),采用 concat
实现头插合并。
对于其他数据的合并,vue 会根据不同的字段采用不同的合并 策略。
# 为什么要使用异步组件
降低打包体积。使用异步组件,vue 在打包的时候会采用异步打包 的方式,而且会采用 jsp 的方式进行加载,从而解决文件过大的 问题。
# 什么是作用域插槽
# 何为插槽
# 浅谈 keep-alive
keep-alive 可以用于实现组件的缓存,使组件在切换的时候不会
立即被销毁。
常用的属性有:
include: 决定哪些组件可以缓存。exclude:决定哪些组件不被缓存。max:最大的缓存数量。
其中,实现最大缓存数量的算法是 LRU算法。
注意事项:keep-alive 也是一个插槽,所以只能接受第一个
组件/元素。
如果 keep-alive 与 router-view 搭配使用的时候,
router-view 所有匹配到的路径。
为了避免将所有匹配到的路径缓存,可以使用 keep-alive 的参数,
或者可以通过 router.meta 来决定释放缓存,详情可以参考
vue-router 之 keep-alive 路由缓存处理 include+exclude (opens new window)。
# Vue 中常见的性能优化
# 编码优化
- 不要将所有的数据都存放在
data中,这会造成增加过多的getter和setter,而且会采用过多的watcher去 收集依赖,从而影响性能。 - 使用
v-for时给每个元素绑定事件的时候使用事件代理。 - 如果是
SPA的话,可以使用keep-alive对组件进行缓存。 - 正确使用
v-show和v-for。对于需要频繁显示和隐藏的组件 采用v-show性能要好一些,不然优先使用v-for。 - 使用
key保证唯一性,避免 vue 在原地复用的时候出现 bug。 - 可以使用
Object.freeze()冻结数据,避免 vue 定义过多的getter和setter。 - 合理使用路由懒加载和异步组件。
- 采用 runtime 版本的 vue。
- 拆分 vue 组件,提高代码的复用性。
# 加载性能优化
- 第三方模块按需导入 ( babel-plugin-component )
- 滚动到可视区域动态加载 ( https://tangbc.github.io/vue-virtual-scroll-list )
- 图片懒加载 (https://github.com/hilongjw/vue-lazyload.git)
# Vue3.0 有哪些改进
- Composition Api
# 实现 hash 路由和 history 路由
# Vue-Router 中导航守卫有哪些
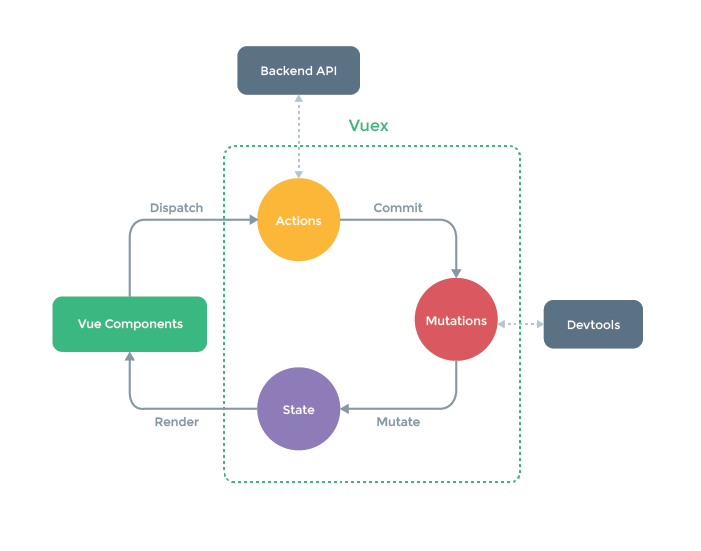
# action 和 mutation 的区别
# 简述 Vuex 的工作原理