react - 实现 react-redux
(本文是基于 Redux 源码专精(17 集完整版) (opens new window) 的学习笔记)
# 引例
// App.jsx
import { useState, useContext, createContext } from 'react'

const AppContext = createContext(null)
const App = () => {
  const [appState, setAppState] = useState({
    user: { name: 'frank', age: 18 },
  })

  const contextValue = { appState, setAppState }
  return (
    <AppContext.Provider value={contextValue}>
      <Parent />
      <Son />
      <Grandson />
    </AppContext.Provider>
  )
}

const Parent = () => (
  <section>
    <h3>Parent</h3>
    <User />
  </section>
)

const Son = () => (
  <section>
    <h3>Son</h3>
    <UserModifier />
  </section>
)

const Grandson = () => (
  <section>
    <h3>Grandson</h3>
  </section>
)

const User = () => {
  const contextValue = useContext(AppContext)
  return <div>user: {contextValue.appState.user.name}</div>
}

const UserModifier = () => {
  const { appState, setAppState } = useContext(AppContext)
  const onChange = e => {
    appState.user.name = e.target.value
    setAppState({ ...appState })
  }
  return (
    <div>
      <input value={appState.user.name} onChange={onChange} />
    </div>
  )
}

export default App
2
3
4
5
6
7
8
9
10
11
12
13
14
15
16
17
18
19
20
21
22
23
24
25
26
27
28
29
30
31
32
33
34
35
36
37
38
39
40
41
42
43
44
45
46
47
48
49
50
51
52
53
54
55
56
57
58
我们创建一个 AppContext 共享 user 数据。
同时,创建三个组件 Parent、Son 和 Grandson。
其中,Parent 用户展示用户信息,Son 用于修改用户信息,
Grandson 什么都不做,也不使用 AppContext,相当于一个
PureComponent。
此外,我们还创建了 User 和 UserModifier 用来展示具体的用户
和修改用户。
考虑 UserModifier 的代码:
const UserModifier = () => {
  const { appState, setAppState } = useContext(AppContext)
  const onChange = e => {
    appState.user.name = e.target.value
    setAppState({ ...appState })
  }
  return (
    <div>
      <input value={appState.user.name} onChange={onChange} />
    </div>
  )
}
2
3
4
5
6
7
8
9
10
11
12
我们直接修改了 appState 上的数据。显然,这种做法是非常
不规范的。为了规范创建 state,我们就需要一个函数来帮忙。
# Reducer 的由来
我们创建一个 createNewState 的函数,用来帮助我们创建一个新的 state。
// App.jsx
/**
 * 基于旧的 `state` 创建新的 `state`,如果不需要改变原有的 `state`,则返回上一次的 `state`。
 * @param state oldState
 * @param actionType
 * @param actionData
 * @returns newState
 */
const createState = (state, actionType, actionData) => {
  if (actionType === 'updateUser') {
    return {
      ...state,
      user: {
        ...state.user,
        ...actionData,
      },
    }
  }
  return state
}
2
3
4
5
6
7
8
9
10
11
12
13
14
15
16
17
18
19
20
有了 createState 函数,我们就可以规范我们创建 state 的过程。
// App.jsx
const UserModifier = () => {
  const { appState, setAppState } = useContext(AppContext)
  const onChange = e =>
    setAppState(createState(appState, 'updateUser', { name: e.target.value }))

  return (
    <div>
      <input value={appState.user.name} onChange={onChange} />
    </div>
  )
}
2
3
4
5
6
7
8
9
10
11
12
可以看到,我们上面的 createState 函数非常像 Reducer,那么干脆就把它叫做 reducer。同时,我们还可以把 actionType 和 actionData 参数合并成一个参数。
下面是具体的修改:
// App.jsx
/**
 * 基于旧的 `state` 创建新的 `state`,如果不需要改变原有的 `state`,则返回上一次的 `state`。
 * @param state
 * @param { type: string, payload: any }
 * @returns newState
 */
const reducer = (state, { type, payload }) => {
  if (type === 'updateUser') {
    return {
      ...state,
      user: {
        ...state.user,
        ...payload,
      },
    }
  }
  return state
}

// ...
const UserModifier = () => {
  const { appState, setAppState } = useContext(AppContext)
  const onChange = e =>
    setAppState(
      reducer(appState, {
        type: 'updateUser',
        payload: { name: e.target.value },
      }),
    )

  return (
    <div>
      <input value={appState.user.name} onChange={onChange} />
    </div>
  )
}
2
3
4
5
6
7
8
9
10
11
12
13
14
15
16
17
18
19
20
21
22
23
24
25
26
27
28
29
30
31
32
33
34
35
36
37
这就是 Reducer 的由来:用于规范我们创建 state 的过程。
# Dispatch 的由来
dispatch 主要是用来规范我们 setState 的过程。来看我们上面 setState 的过程:
const onChange = e =>
  setAppState(
    reducer(appState, {
      type: 'updateUser',
      payload: { name: e.target.value },
    }),
  )
2
3
4
5
6
7
显然前面的部分重复性太高了。例如:我们要修改 user.age,那么我们可能会写出如下代码:
const onChange = e =>
  setAppState(
    reducer(appState, {
      type: 'updateUser',
      payload: { age: 20 },
    }),
  )
2
3
4
5
6
7
为了规范 setState,我们可以把上面的代码进行抽离:
// App.jsx
const dispatch = action => {
  setAppState(reducer(appState, action))
}
2
3
4
但是,新的问题又出现了,非组件内部无法访问到 setState。最干脆的办法是将创建 setState 的 hook 也提炼到 dispatch。但这样做不利于我们后续对于 dispatch 的抽离。于是我们可以创建
一个组件,然后把 dispatch 传给这个组件。听起来很麻烦,让我们直接看代码实现:
// App.jsx
const Wrapper = () => {
  const { appState, setAppState } = useContext(AppContext)
  const dispatch = action => {
    setAppState(reducer(appState, action))
  }
  return <UserModifier dispatch={dispatch} state={appState} />
}
2
3
4
5
6
7
8
有了 Wrapper 组件,我们就可以拿到 context,然后我们将封装好的 dispatch 传给 UserModifier 组件。
同时,我们还需要对 UserModifier 进行修改,从 props 中拿到 state,
也可以拿到修改 state 的方法(dispatch)。
// App.jsx
const UserModifier = ({ dispatch, state }) => {
  const onChange = e =>
    dispatch({ type: 'updateUser', payload: { name: e.target.value } })

  return (
    <div>
      <input value={state.user.name} onChange={onChange} />
    </div>
  )
}
2
3
4
5
6
7
8
9
10
11
其次,我们还需要对使用到 UserModifier 的地方进行修改,改为 Wrapper。
// App.jsx
const Son = () => (
  <section>
    <h3>Son</h3>
    <Wrapper />
  </section>
)
2
3
4
5
6
7
经过上面的操作,我们实现使用 dispatch 规范 setState 的过程。
# Connect 的由来
我们上面使用 Wrapper 对 UserModifier 进行包装,使用的时候也需要使用 Wrapper
才能使 UserModifier 正常工作(否则从 props 获取不到 dispatch 和 state)。
因此,我们任何一个组件想要从 props 获取 dispatch 和 state 都需要封装一个像
Wrapper 的组件。如果是这样做的话,工作量会很大。所以我们可以封装一个 createWrapper
的函数,用来创建 Wrapper。
// App.jsx
const createWrapper = Component => {
  const Wrapper = props => {
    const { appState, setAppState } = useContext(AppContext)
    const dispatch = action => {
      setAppState(reducer(appState, action))
    }
    return <Component {...props} dispatch={dispatch} state={appState} />
  }
  return Wrapper
}
2
3
4
5
6
7
8
9
10
11
可以看到,我们只是把 Wrapper 的代码直接帮运到 createWrapper 中,然后修改其中一小部分
从而实现创建通用组件的 Wrapper 和 props 透传。对应上面的第 3, 8 行代码。
然后我们就可以修改 Wrapper 的代码:
// App.jsx
const Wrapper = createWrapper(UserModifier)
2
这里需要注意一下 Wrapper 的创建顺序应该在 UserModifier 后面。
事实上,我们现在的代码还可以进行优化,由于 UserModifier 只用到一次,我们就
直接将他丢进 createWrapper 里面。同时,我们将 Wrapper 修改为 UserModifier。
// App.jsx
const Son = () => (
  <section>
    <h3>Son</h3>
    {/* 将 Wrapper 修改为 UserModifier */}
    <UserModifier />
  </section>
)

// 将 Wrapper 修改为 UserModifier
// 同时,将原先的 UserModifier 的代码放在 createWrapper 的参数中。
const UserModifier = createWrapper(({ dispatch, state }) => {
  const onChange = e =>
    dispatch({ type: 'updateUser', payload: { name: e.target.value } })

  return (
    <div>
      <input value={state.user.name} onChange={onChange} />
    </div>
  )
})
2
3
4
5
6
7
8
9
10
11
12
13
14
15
16
17
18
19
20
21
经过上面的改造,我们创建组件的过程就是在组件外部创建一个 Wrapper。
也就是说 createWrapper 将组件与全局状态连接起来。所以在 React-Redux
中把 createWrapper 函数叫做 connect。
所以,我们可以对 createWrapper 进行简单的修改:
// App.jsx
// 将 createWrapper 改名为 connect
// 同时,优化内部代码。
const connect = Component => {
  return props => {
    const { appState, setAppState } = useContext(AppContext)
    const dispatch = action => {
      setAppState(reducer(appState, action))
    }
    return <Component {...props} dispatch={dispatch} state={appState} />
  }
}

// 将 Wrapper 修改为 UserModifier
// 同时,将原先的 UserModifier 的代码放在 createWrapper 的参数中。
const UserModifier = connect(({ dispatch, state }) => {
  const onChange = e =>
    dispatch({ type: 'updateUser', payload: { name: e.target.value } })

  return (
    <div>
      <input value={state.user.name} onChange={onChange} />
    </div>
  )
})
2
3
4
5
6
7
8
9
10
11
12
13
14
15
16
17
18
19
20
21
22
23
24
25
# 使用 connect 减少 render
我们现在的代码存在一个问题:太多的 render 了。我们可以在每个组件内部添加一些 log 信息进行观察:
// App.jsx
const Parent = () => {
  console.log('Parent: ', Math.random())
  return (
    <section>
      <h3>Parent</h3>
      <User />
    </section>
  )
}

const Son = () => {
  console.log('Son: ', Math.random())
  return (
    <section>
      <h3>Son</h3>
      <UserModifier />
    </section>
  )
}

const Grandson = () => {
  console.log('Grandson: ', Math.random())
  return (
    <section>
      <h3>Grandson</h3>
    </section>
  )
}
const User = () => {
  console.log('User: ', Math.random())
  const contextValue = useContext(AppContext)
  return <div>user: {contextValue.appState.user.name}</div>
}

const UserModifier = connect(({ dispatch, state }) => {
  console.log('UserModifier: ', Math.random())
  const onChange = e =>
    dispatch({ type: 'updateUser', payload: { name: e.target.value } })

  return (
    <div>
      <input value={state.user.name} onChange={onChange} />
    </div>
  )
})
2
3
4
5
6
7
8
9
10
11
12
13
14
15
16
17
18
19
20
21
22
23
24
25
26
27
28
29
30
31
32
33
34
35
36
37
38
39
40
41
42
43
44
45
46
来看控制台的输出结果:
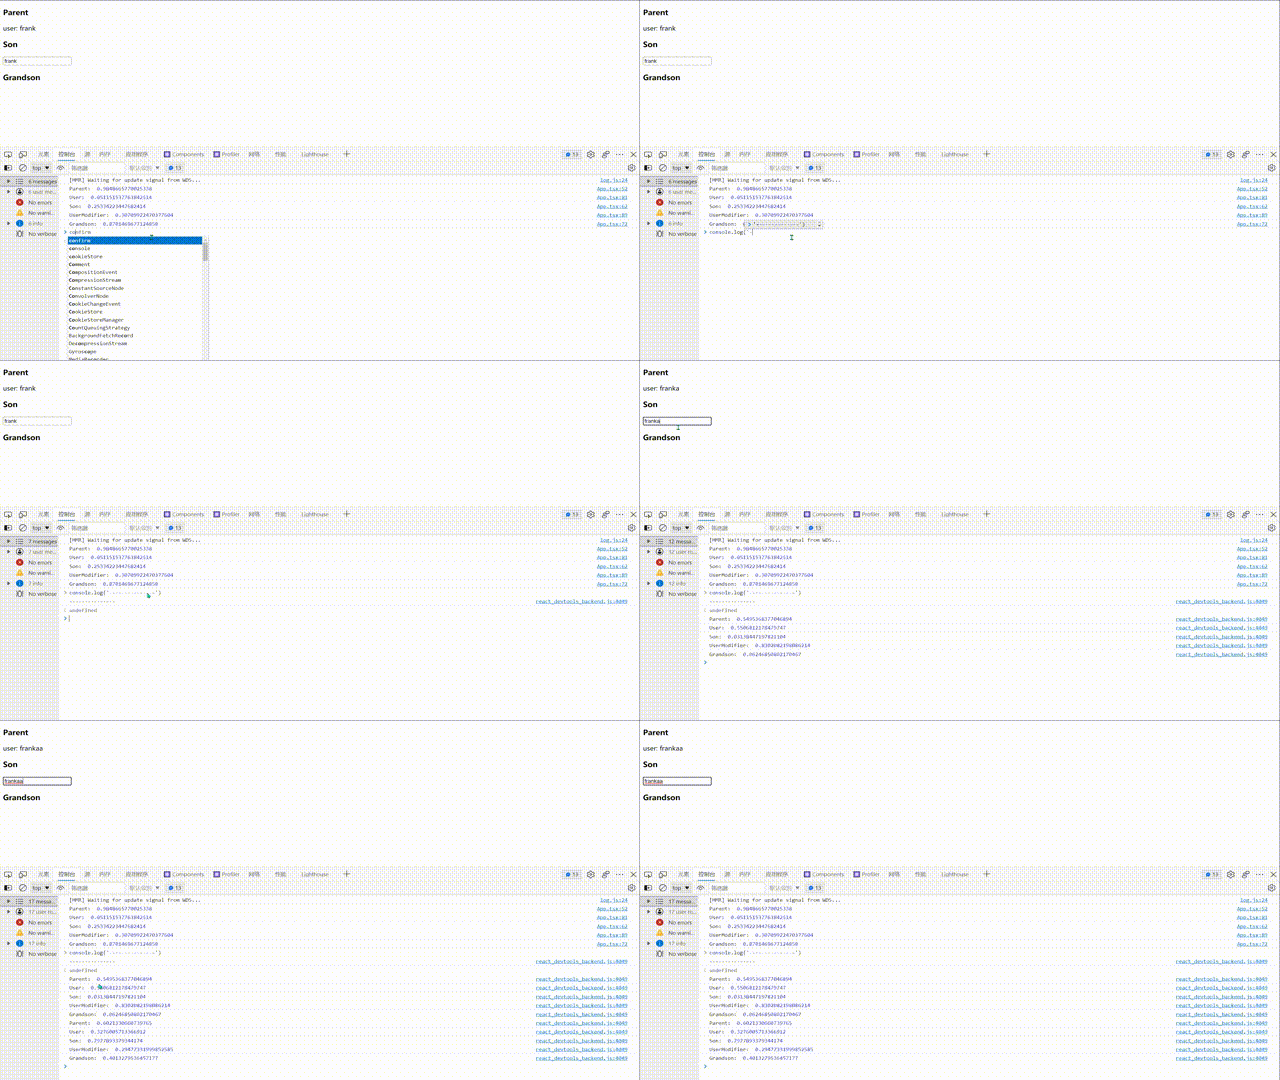
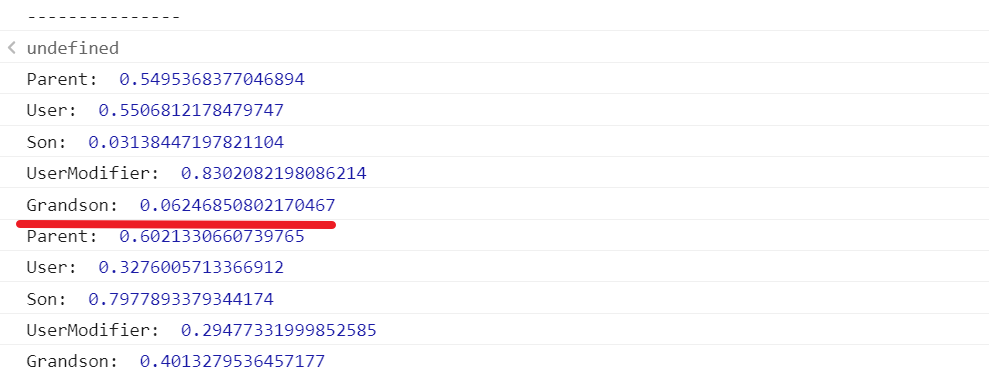
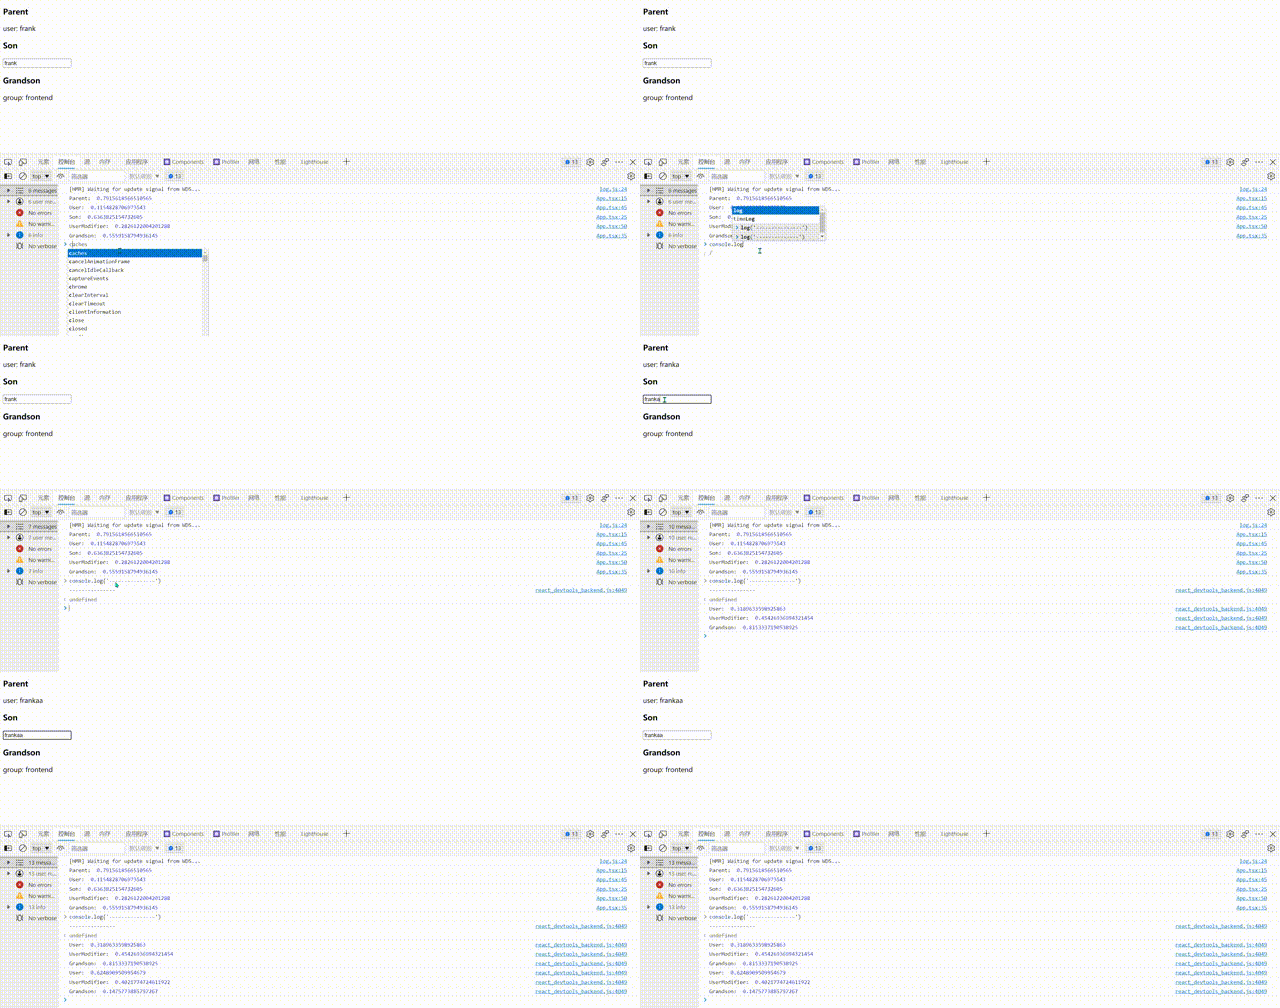
我们输入了 2 次,发现所有组件都执行了各自的 render 方法,这显然是有问题的。因为我们有些组件压根就没有
依赖 state,所以没必要进行 render。
造成这个问题主要在于我们最终的 setState 是来自 App 组件中的 setAppState,所以一旦数据发生变化,
我们就会执行 App 的 render 方法,自然而然就会执行子组件的 render 方法。
那么我们就需要 Redux 为我们提供一种机制,就是只有依赖到相应 state的组件才能触发它的 render 方法。
接下来我们就开始改造 state 和 setState。
首先我们需要用中央集成仓库,用来存放 state。同时,提供一个 setState 的方法。
// App.jsx
const store = {
  state: {
    user: { name: 'frank', age: 18 }, // 暂且进行简单的初始化
  },
  setState(newState) {
    console.log(newState) // 用于调试
    store.state = newState
  },
}
2
3
4
5
6
7
8
9
10
然后我们就需要改造 App 组件的代码了,直接使用 store 作为 context 的 value。
const App = () => {
  return (
    <AppContext.Provider value={store}>
      <Parent />
      <Son />
      <Grandson />
    </AppContext.Provider>
  )
}
2
3
4
5
6
7
8
9
接下来就轮到 connect 函数了,connect 函数不再从 context 中获取 state,而是从
store 中直接获取:
const connect = Component => {
  return props => {
    const { state, setState } = store
    const dispatch = action => {
      setState(reducer(state, action))
    }
    return <Component {...props} dispatch={dispatch} state={state} />
  }
}
2
3
4
5
6
7
8
9
最后,User 也需要修改一下:
// App.sjx
const User = () => {
  console.log('User: ', Math.random())
  const { state } = useContext(AppContext)
  return <div>user: {state.user.name}</div>
}
2
3
4
5
6
让我们回过头来看我们的页面:我们在输入框中输入后会发现我们的页面更新不了,但是
控制台却有输出,这究竟是为什么呢?事实上,我们没有调用 React 为我们提供的 setState
刷新页面自然页面就更新不了。
为了让我们的页面能够更新,我们可以在 dispatch 时对页面就行更新,这里就需要修改 connect 的代码:
// App.sjx
const connect = Component => {
  return props => {
    const { state, setState } = store
    const [, update] = useState({})
    const dispatch = action => {
      setState(reducer(state, action))
      update({})
    }
    return <Component {...props} dispatch={dispatch} state={state} />
  }
}
2
3
4
5
6
7
8
9
10
11
12
这样就确保了只有 connect 的组件(也是依赖到 state 的组件)才会刷新页面。
此外,我们还需要需改 User 组件,让他也依赖到 store 中的 state。
// App.jsx
const User = connect(({ state }) => {
  console.log('User: ', Math.random())
  return <div>user: {state.user.name}</div>
})
2
3
4
5
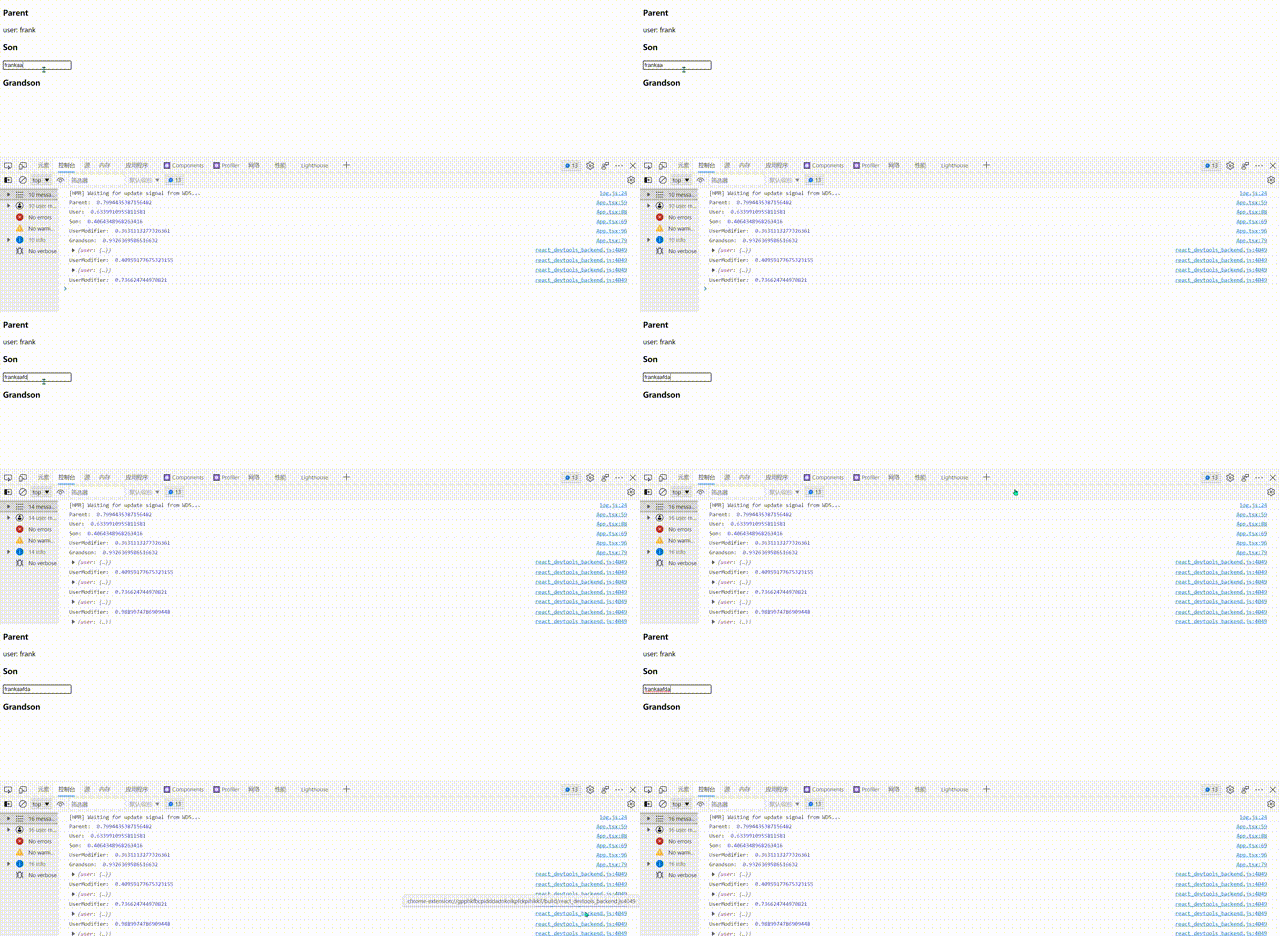
可以看到,现在我们输入框会随着我们的输入而改变。但是上面 <User /> 展示仍然会不会发生改变。
这是因为每个 connect 的组件都有自己的 dispatch 方法(仔细去看一下 connect 的
实现就可以明白了),UserModifier 的 dispatch
并不会触发 User 的 dispatch,所以我们就需要进行订阅。
接下来我们修改一下 store,让其提供订阅的功能:
// App.jsx
const store = {
  state: {
    user: { name: 'frank', age: 18 }, // 暂且进行简单的初始化
  },
  setState(newState) {
    store.state = newState
    store.listeners.forEach(fn => fn(store.state))
  },
  listeners: [],
  subscribe(fn) {
    store.listeners.push(fn)
    return () => {
      const index = store.listeners.indexOf(fn)
      if (index >= 0) store.listeners.splice(index, 1)
    }
  },
}
2
3
4
5
6
7
8
9
10
11
12
13
14
15
16
17
18
在 store 内部保存一个 listeners 数组,用来保存订阅者。
在提供的 subscribe 函数中,我们还返回了一个函数,用来取消订阅。
然后在每一次的 setState 时,我们去通知订阅者 state 已经更新,
同时传给最新的 state。
接下来我们对需要用到 store 中 state 的组件进行订阅,换句话说,我们
需要在 connect 进行 subscribe :
// App.jsx
const connect = Component => {
  return props => {
    const { state, setState } = store
    const [, update] = useState({})

    // 别忘了导入 useEffect
    useEffect(() => store.subscribe(() => update({})), [])

    const dispatch = action => {
      setState(reducer(state, action))
    }
    return <Component {...props} dispatch={dispatch} state={state} />
  }
}
2
3
4
5
6
7
8
9
10
11
12
13
14
15
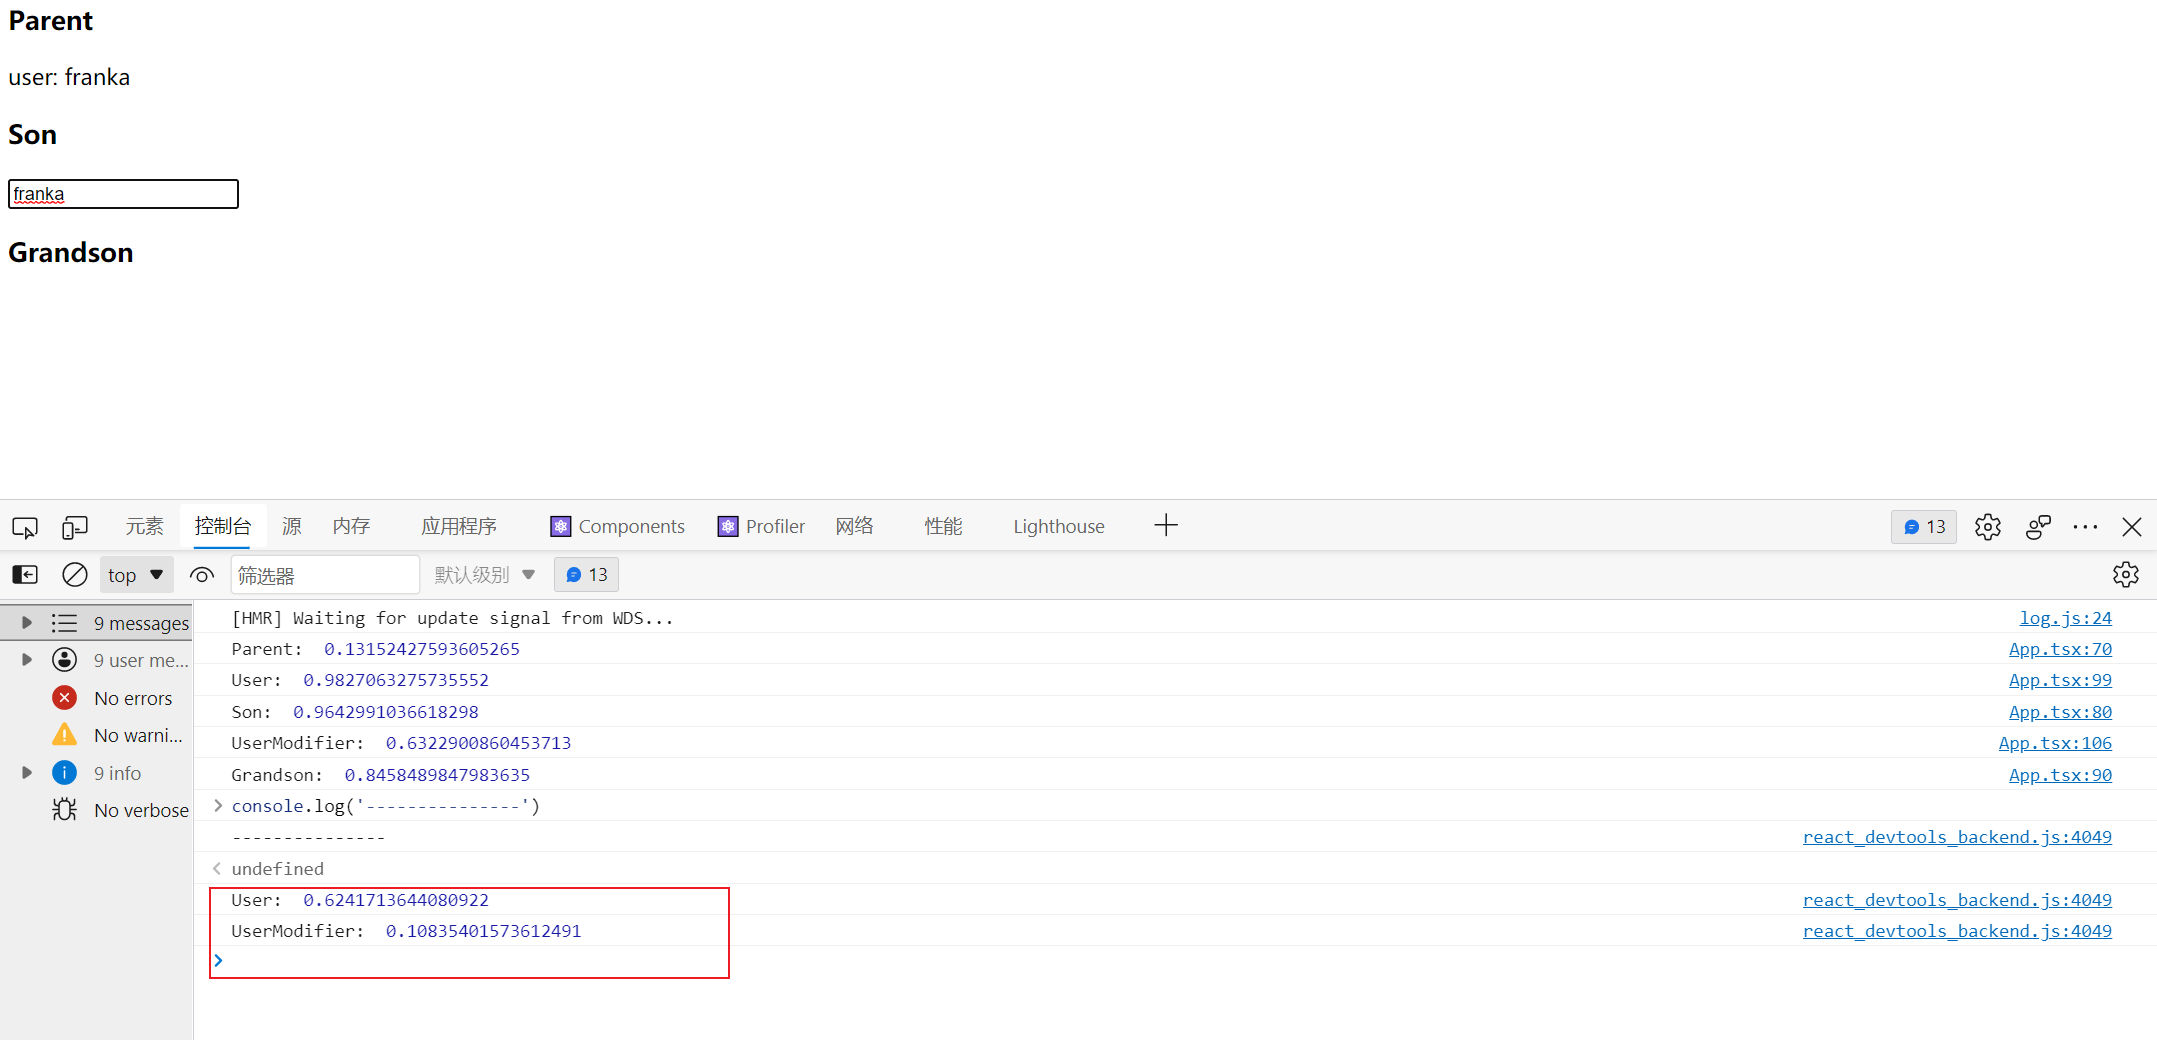
注意这里 useEffect 的用法,返回 store.subscribe() 在下一次 render 的时候,
取消副作用。可以看到我们更新 state 的时候,只有依赖到 state 的组件才会更新。
# React-Redux
至此,我们已经实现 React-Redux 的大部分功能,接下来我们就需要将相关的代码移动到
单独的文件。
# mapStateToProps
在讲 mapStateToProps 之前来看一下我们的 User 组件:
const User = connect(({ state }) => {
  console.log('User: ', Math.random())
  return <div>user: {state.user.name}</div>
})
2
3
4
可以看到 User 组件只用到了 user,那么我们能否在 connect
连接组件的时候直接拿到对应的数据?就像下面操作一样:
// App.jsx
const User = connect(state => ({ user: state.user }))(({ user }) => {
  console.log('User: ', Math.random())
  return <div>user: {user.name}</div>
})
2
3
4
5
这样做的好处在于我们可以快速地获取局部的 state,而不需要进行
层层层层访问才能获取到 state。
接下来我们从代码的层面实现这个功能:
// react-redux.jsx
export const connect = mapStateToProps => Component => {
  return props => {
    const { state, setState } = store
    const [, update] = useState({})
    useEffect(() => store.subscribe(() => update({})), [])

    const data =
      typeof mapStateToProps === 'function'
        ? mapStateToProps(state)
        : { state }

    const dispatch = action => {
      setState(reducer(state, action))
    }
    return <Component {...props} dispatch={dispatch} {...data} />
  }
}
2
3
4
5
6
7
8
9
10
11
12
13
14
15
16
17
18
接下来,我们就需要在使用到 connect 的地方进行修改,需要预先执行
connect:
// App.jsx
const UserModifier = connect()(({ dispatch, state }) => {
  // ...
})
2
3
4
# 精准渲染
来看一下我们现在还存在的问题:我们在 store 添加一个新的 state,
然后在 Grandson 组件中,我们使用这个新的 state:
// react-redux.jsx
export const store = {
  state: {
    user: { name: 'frank', age: 18 }, // 暂且进行简单的初始化
    group: { name: 'frontend' },
  },
  // ...
}

// App.jsx
const Grandson = connect(state => ({ group: state.group }))(({ group }) => {
  console.log('Grandson: ', Math.random())
  return (
    <section>
      <h3>Grandson</h3>
      <div>group: {group.name}</div>
    </section>
  )
})
2
3
4
5
6
7
8
9
10
11
12
13
14
15
16
17
18
19
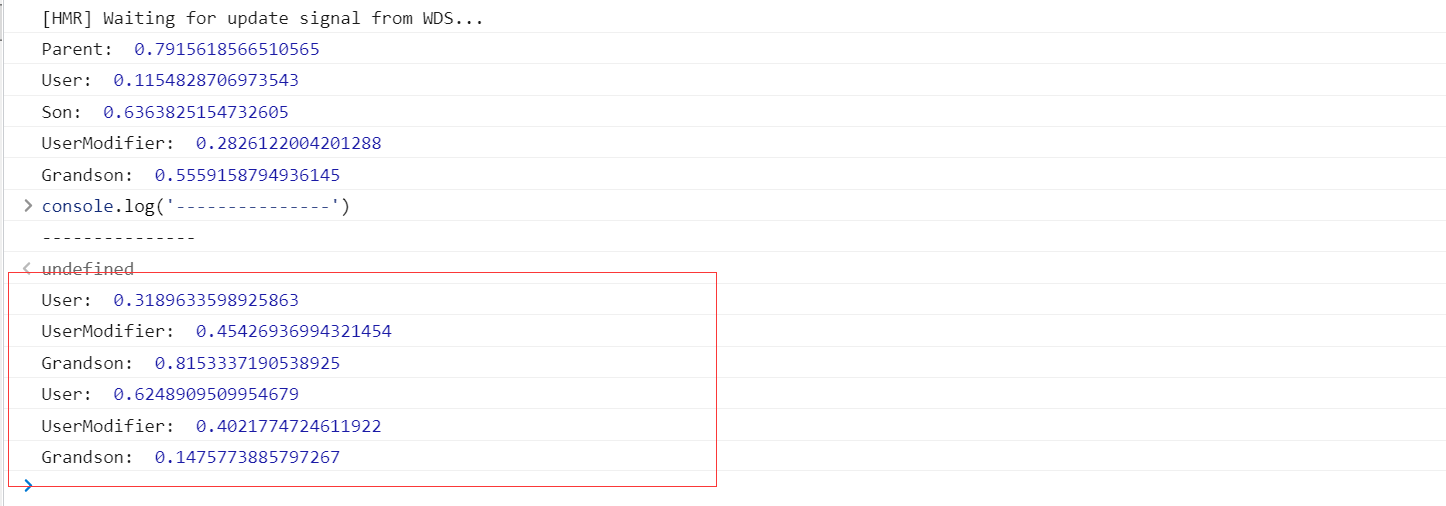
我们知道,Grandson 组件只依赖到 state.group,如果我们更新
state 的其他数据, Grandson 不应该被更新,但实际上,Grandson
会随着 state 的更新而更新,来看下面的运行结果:
于是我们需要修改一下更新策略,这里需要借助一个函数用来判断两个对象是否相同,
我们这个函数放在 utils.js 文件中。
// utils.js
export const shallowEqual = (o1, o2) => {
  if (o1 === o2) {
    return true
  }

  if (
    typeof o1 !== 'object' ||
    o1 === null ||
    typeof o2 !== 'object' ||
    o2 === null
  ) {
    return false
  }

  const keysO1 = Object.keys(o1)
  if (keysO1.length !== Object.keys(o2).length) {
    return false
  }

  for (const key of keysO1) {
    if (!o2.hasOwnProperty(key) || o1[key] !== o2[key]) {
      return false
    }
  }

  return true
}
2
3
4
5
6
7
8
9
10
11
12
13
14
15
16
17
18
19
20
21
22
23
24
25
26
27
28
有了这个工具函数,我们就可以着手实现精准渲染。
// react-redux.jsx
export const connect = mapStateToProps => Component => {
  return props => {
    const [, update] = useState({})
    mapStateToProps =
      typeof mapStateToProps === 'function'
        ? mapStateToProps
        : state => ({ state })
    const data = mapStateToProps(store.state)

    useEffect(
      () =>
        store.subscribe(() => {
          const newData = mapStateToProps(store.state)
          if (!shallowEqual(data, newData)) {
            update({})
          }
        }),
      [data],
    )

    const dispatch = action => {
      store.setState(reducer(store.state, action))
    }
    return <Component {...props} dispatch={dispatch} {...data} />
  }
}
2
3
4
5
6
7
8
9
10
11
12
13
14
15
16
17
18
19
20
21
22
23
24
25
26
27
核心逻辑放在 subscribe 中,决定我们是否需要更新视图。
这里需要注意的是在第 12 行(也就是 const newData = mapStateToProps(store.state))
根据 state 创建新数据的时候,我们需要传入 store.state 以确保拿到最新的 state。如果还是采用老的 state 去执行 mapStateToProps
那么 shallowEqual(data, newData)的结果一定是 true。
为了看出区别,我们在 Grandson 中也添加一个修改的功能:
// App.jsx
const Grandson = connect(state => ({ group: state.group }))(
  ({ group, dispatch }) => {
    console.log('Grandson: ', Math.random())
    const onChange = e => {
      dispatch({ type: 'updateGroup', payload: { name: e.target.value } })
    }
    return (
      <section>
        <h3>Grandson</h3>
        <div>group: {group.name}</div>
        <input type='text' value={group.name} onChange={onChange} />
      </section>
    )
  },
)
2
3
4
5
6
7
8
9
10
11
12
13
14
15
16
下面请看实现后的结果:
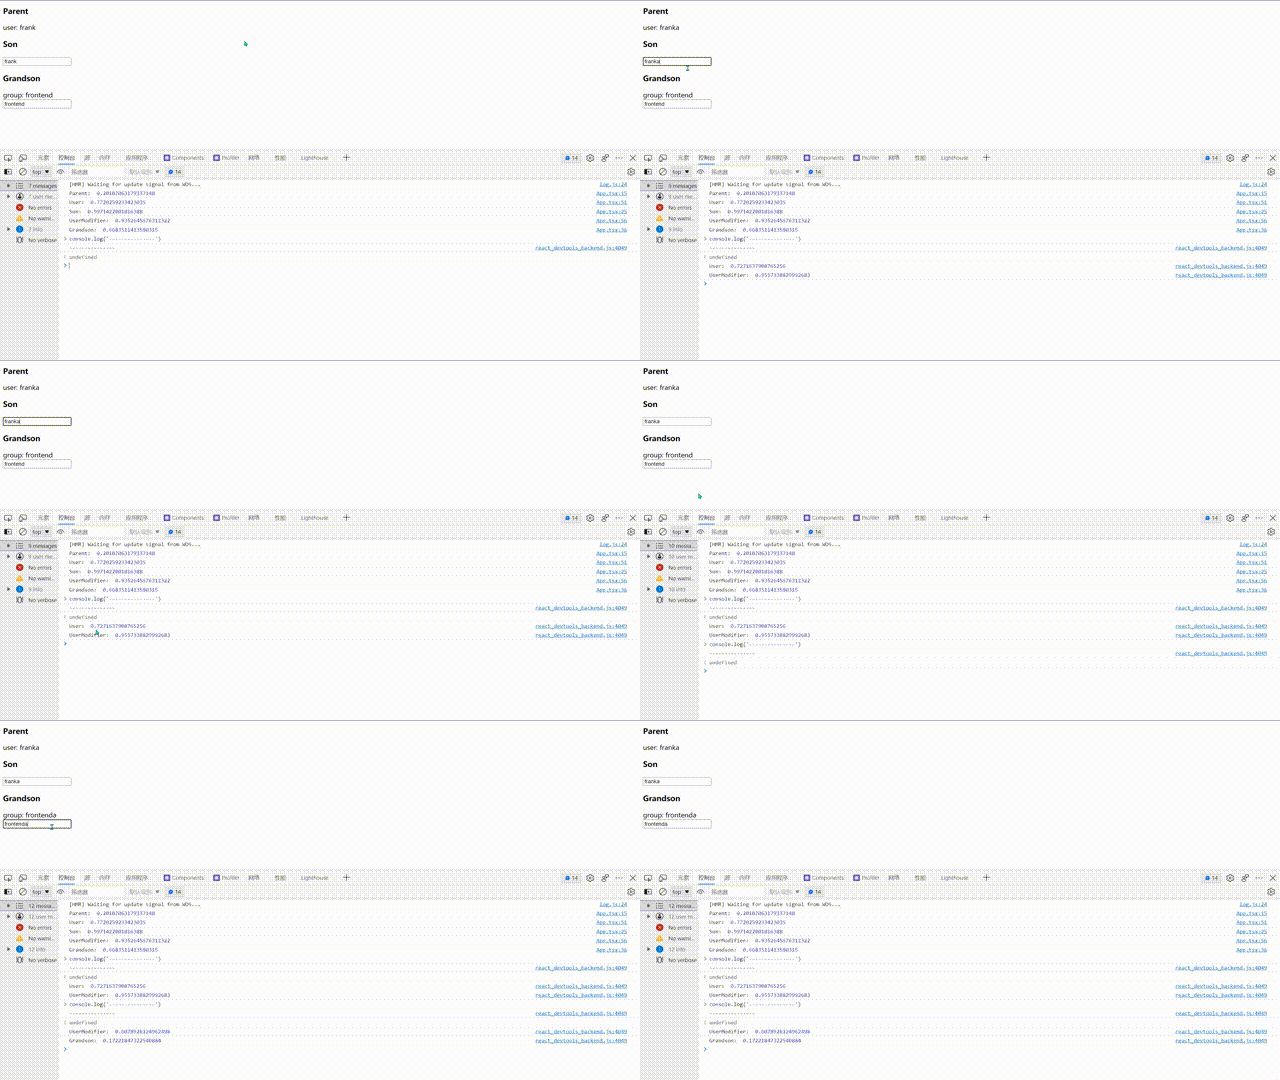
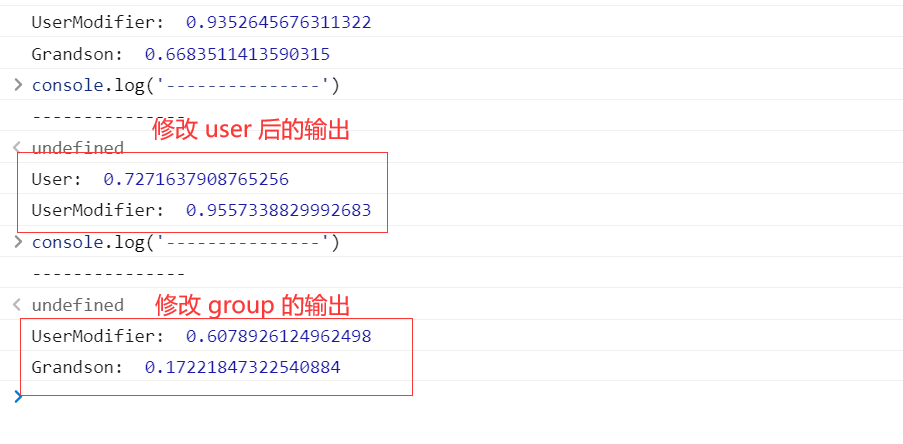
可以看到,修改 user 的时候,组件 Grandson 不再更新,但是 UserModifier 会
更新,因为我们在创建 UserModifier 的时候,没有指明 connect() 的 mapStateToProps
所以会采用 store.state 作为默认参数。
# mapDispatchToProps
接下来我们要实现 mapDispatchToProps 功能。这个功能允许我们直接
调用 dispatch,例如下面的示例:
// App.jsx
const UserModifier = connect(null, dispatch => {
  return {
    updateUser: payload => dispatch({ type: 'updateUser', payload }),
  }
})(({ updateUser, state }) => {
  console.log('UserModifier: ', Math.random())
  const onChange = e => updateUser({ name: e.target.value })

  return (
    <div>
      <input value={state.user.name} onChange={onChange} />
    </div>
  )
})
2
3
4
5
6
7
8
9
10
11
12
13
14
15
对比之前的 dispatch 过程,我们可以看到上面的实现非常简洁:
// 之前的 dispatch
dispatch({ type: 'updateUser', payload: { name: e.target.value } })

// 使用 mapDispatchToProps 后
updateUser({ name: e.target.value })
2
3
4
5
让我们开始动手吧!
// react-redux.jsx
export const connect = (mapStateToProps, mapDispatchToProps) => Component => {
  return props => {
    const [, update] = useState({})
    const dispatch = action => {
      store.setState(reducer(store.state, action))
    }

    mapStateToProps =
      typeof mapStateToProps === 'function'
        ? mapStateToProps
        : state => ({ state })
    const data = mapStateToProps(store.state)

    const dispatchers =
      typeof mapDispatchToProps === 'function'
        ? mapDispatchToProps(dispatch)
        : { dispatch }

    useEffect(
      () =>
        store.subscribe(() => {
          const newData = mapStateToProps(store.state)
          if (!shallowEqual(data, newData)) {
            update({})
          }
        }),
      [data],
    )

    return <Component {...props} {...dispatchers} {...data} />
  }
}
2
3
4
5
6
7
8
9
10
11
12
13
14
15
16
17
18
19
20
21
22
23
24
25
26
27
28
29
30
31
32
33
# 回头看 connect
回过头来我们来看 connect 的实现:
connect(mapStateToProps, mapDispatchToProps)(Component)
我们不经思考,为什么 react-redux 不把这三个参数放在一个函数中呢?
而是闭包的方式进行缓存。
在回答这个问题之前,我们来修改一下我们的代码。
由于我们的组件 User 和 UserModifier 都是对 state.user
的读和写操作,我们何尝不把这两个组件的创建过程进行提炼?
先来看未提炼之前的代码:
// App.sjx
const User = connect(state => ({ user: state.user }))(({ user }) => {
  console.log('User: ', Math.random())
  return <div>user: {user.name}</div>
})

const UserModifier = connect(null, dispatch => {
  return {
    updateUser: payload => dispatch({ type: 'updateUser', payload }),
  }
})(({ updateUser, state }) => {
  console.log('UserModifier: ', Math.random())
  const onChange = e => updateUser({ name: e.target.value })

  return (
    <div>
      <input value={state.user.name} onChange={onChange} />
    </div>
  )
})
2
3
4
5
6
7
8
9
10
11
12
13
14
15
16
17
18
19
20
接下来,我们就将这个创建过程进行提炼:
// App.jsx
const userSelector = state => ({ user: state.user })
const userDispatchers = dispatch => ({
  updateUser: payload => dispatch({ type: 'updateUser', payload }),
})
const User = connect(
  userSelector,
  userDispatchers,
)(({ user }) => {
  console.log('User: ', Math.random())
  return <div>user: {user.name}</div>
})

const UserModifier = connect(
  userSelector,
  userDispatchers,
)(({ updateUser, user /* 注意要将 state 修改为 user */ }) => {
  console.log('UserModifier: ', Math.random())
  const onChange = e => updateUser({ name: e.target.value })

  return (
    <div>
      <input value={user.name /* 这里也需要稍作修改 */} onChange={onChange} />
    </div>
  )
})
2
3
4
5
6
7
8
9
10
11
12
13
14
15
16
17
18
19
20
21
22
23
24
25
26
可以看到我们的代码又变得非常简洁。其实,我们还可以进一步优化将 connect(xxx)
进一步提炼:
// App.jsx
const userSelector = state => ({ user: state.user })
const userDispatchers = dispatch => ({
  updateUser: payload => dispatch({ type: 'updateUser', payload }),
})
const connectToUser = connect(userSelector, userDispatchers)

const User = connectToUser(({ user }) => {
  console.log('User: ', Math.random())
  return <div>user: {user.name}</div>
})

const UserModifier = connectToUser(({ updateUser, user }) => {
  console.log('UserModifier: ', Math.random())
  const onChange = e => updateUser({ name: e.target.value })

  return (
    <div>
      <input value={user.name} onChange={onChange} />
    </div>
  )
})
2
3
4
5
6
7
8
9
10
11
12
13
14
15
16
17
18
19
20
21
22
有了前面的准备工作,我们接下来还可以将提炼出来的 connectToUser 抽离
到另外一个文件夹中。我们创建一个 connectors 文件夹,用于存放 connect
创建的 connectors。
// connectors/connect-to-user.jsx
import { connect } from '../react-redux'

const userSelector = state => ({ user: state.user })
const userDispatchers = dispatch => ({
  updateUser: payload => dispatch({ type: 'updateUser', payload }),
})
export const connectToUser = connect(userSelector, userDispatchers)
2
3
4
5
6
7
8
接下来我们就可以把 App.jsx 中涉及到 connectToUser 部分的代码删除,
同时从 connectors/connect-to-user 中导入 connectToUser 即可。
完成上述操作后,我们再来回答一开始的问题:为什么 react-redux 不把这三个参数放在一个函数中呢?
从实现来看,mapStateToProps 用来封装读取 state 的操作,
mapDispatchToProps 用来封装写入 state 的操作,
而 connect(mapStateToProps, mapDispatchToProps) 是用来
封装读写 state 的操作。
之所以分成两次调用,是为了让我们创建一个半成品,允许我们与不同组件相结合, 同时使用闭包进行缓存提高程序运行的效率。
# 封装 Provider 和 createStore
到目前为止,我们实现的 react-redux 存在一个严重的不足:我们的 state 和
reducer 写死了。我们需要让用户自行初始化和传入 reducer。
我们需要一个封装一个 createStore 的函数。具体做法如下:
// react-redux.jsx
const store = {
  state: null,
  reducer: null,
  setState(newState) {
    store.state = newState
    store.listeners.forEach(fn => fn(store.state))
  },
  listeners: [],
  subscribe(fn) {
    store.listeners.push(fn)
    return () => {
      const index = store.listeners.indexOf(fn)
      if (index >= 0) store.listeners.splice(index, 1)
    }
  },
}

export const createStore = (reducer, initState) => {
  store.state = initState
  store.reducer = reducer
  return store
}
2
3
4
5
6
7
8
9
10
11
12
13
14
15
16
17
18
19
20
21
22
23
有了 createStore 我们就可以修改 App 里面的 store。
// App.jsx
const initState = {
  user: { name: 'frank', age: 18 },
  group: { name: 'frontend' },
}

/**
 * 基于旧的 `state` 创建新的 `state`,如果不需要改变原有的 `state`,则返回上一次的 `state`。
 * @param state
 * @param { type: string, payload: any }
 * @returns newState
 */
const reducer = (state, { type, payload }) => {
  if (type === 'updateUser') {
    return {
      ...state,
      user: {
        ...state.user,
        ...payload,
      },
    }
  }
  if (type === 'updateGroup') {
    return {
      ...state,
      group: payload,
    }
  }
  return state
}

const store = createStore(reducer, initState)
2
3
4
5
6
7
8
9
10
11
12
13
14
15
16
17
18
19
20
21
22
23
24
25
26
27
28
29
30
31
32
接下来我们就来封装一下 Provider,实现如下的效果:
const App = () => {
  return <Provider value={store}>{/*...*/}</Provider>
}
2
3
我们只需要对 AppContext.Provider 进行简单封装即可:
// react-redux.jsx
const AppContext = createContext(null)
export const Provider = ({ store, ...restProps }) => {
  return <AppContext.Provider value={store} {...restProps} />
}
2
3
4
5
# react-redux 及其各种概念
我们上面实现的功能可以描述为下面的一张图:
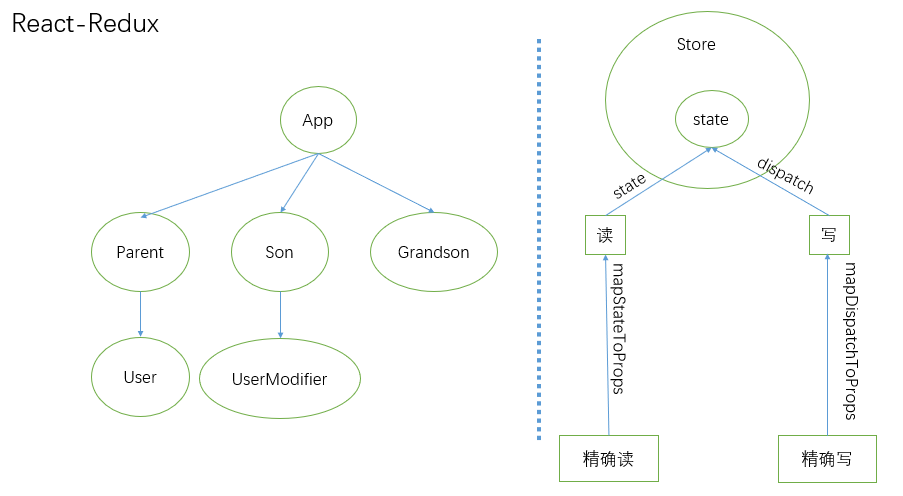
react-redux 为我们实现的是组件和 store 连接(connect)以及两个读和写的 API。
其中,connect 做的是对组件进行封装。
- 从
store里面获取读和写的 API。(我们的代码直接从store上拿) - 对拿到的接口进行封装。根据
mapStateToProps和mapDispatchToProps进行封装。 - 在恰当的时候进行更新。只有
store发生变化,才对页面进行更新。 - 渲染组件。
export const connect = (mapStateToProps, mapDispatchToProps) => Component => {
  return props => {
    const [, update] = useState({})
    const dispatch = action => {
      store.setState(store.reducer(store.state, action))
    }

    mapStateToProps =
      typeof mapStateToProps === 'function'
        ? mapStateToProps
        : state => ({ state })
    const data = mapStateToProps(store.state)

    const dispatchers =
      typeof mapDispatchToProps === 'function'
        ? mapDispatchToProps(dispatch)
        : { dispatch }

    useEffect(
      () =>
        store.subscribe(() => {
          const newData = mapStateToProps(store.state)
          if (!shallowEqual(data, newData)) {
            update({})
          }
        }),
      [data],
    )

    return <Component {...props} {...dispatchers} {...data} />
  }
2
3
4
5
6
7
8
9
10
11
12
13
14
15
16
17
18
19
20
21
22
23
24
25
26
27
28
29
30
31
现在我们已经知道 react-redux 的绝大部分概念:
- store
- state
- dispatch
- reducer
- initState
- action
- type;action 的类型。
- payload:action 携带的信息。
- connect
- Provider
- middlewares
接下来我们讲一下最后的一个 middleware,在讲之前,我们先对原有的 API 重构,
使得对外暴露更少的接口。
# 重构
下面我们将会对代码进行重构,实现与 Redux 一样简洁的接口:
Store Methods:
getState()dispatch(action)subscribe(listener)replaceReducer(nextReducer)
重构的过程非常简单,只需要将 store 中部分成员变量抽离到模块作用域下,
引用到 store.method 的部分改为从模块作用域下获取。重构后的代码如下:
import { createContext, useState, useEffect } from 'react'
import {
  shallowEqual,
  isFunc /* 将 typeof fn === 'function' 抽离到 utils 下 */,
} from './utils'
const AppContext = createContext(null)
export const Provider = ({ store, ...restProps }) => (
  <AppContext.Provider value={store} {...restProps} />
)

let state = null
let reducer = null
const listeners = []
const setState = newState => {
  state = newState
  listeners.forEach(listener => listener(state))
}
const dispatch = action => setState(reducer(state, action))
const getState = () => state
const replaceReducer = nextReducer => (reducer = nextReducer)
const subscribe = listener => {
  listeners.push(listener)
  return () => {
    const index = listeners.indexOf(listener)
    if (index >= 0) listeners.splice(index, 1)
  }
}

const store = {
  getState,
  subscribe,
  replaceReducer,
  dispatch,
}

export const createStore = (_reducer, initState) => {
  state = initState
  reducer = _reducer
  return store
}

export const connect = (mapStateToProps, mapDispatchToProps) => Component => {
  return props => {
    const [, update] = useState({})

    mapStateToProps = isFunc(mapStateToProps)
      ? mapStateToProps
      : state => ({ state })
    const data = mapStateToProps(state)

    const dispatchers = isFunc(mapDispatchToProps)
      ? mapDispatchToProps(dispatch)
      : { dispatch }

    useEffect(
      () =>
        store.subscribe(() => {
          const newData = mapStateToProps(state)
          if (!shallowEqual(data, newData)) {
            update({})
          }
        }),
      [data],
    )

    return <Component {...props} {...dispatchers} {...data} />
  }
}
2
3
4
5
6
7
8
9
10
11
12
13
14
15
16
17
18
19
20
21
22
23
24
25
26
27
28
29
30
31
32
33
34
35
36
37
38
39
40
41
42
43
44
45
46
47
48
49
50
51
52
53
54
55
56
57
58
59
60
61
62
63
64
65
66
67
68
# 异步 Action
目前 Redux 是不支持异步 action 的,这是为了确保 reducer 是纯函数。
为了让 Redux 支持异步 action 就出现了许多有名的中间件,下面就
介绍一下异步 action 的由来以及实现异步 action 的原理。
我们先来模拟一下异步 action 的场景:我们修改我们的 UserModifier 组件
来模拟异步 action
// App.jsx
const fetchData = url => {
  return new Promise(resolve => {
    setTimeout(() => {
      resolve({ data: { name: '1s 后返回的结果' } })
    }, 1000)
  })
}
const fetchUser = dispatch => {
  fetchData('/user').then(response => {
    dispatch({ type: 'updateUser', payload: response.data })
  })
}
const UserModifier = connect()(({ state, dispatch }) => {
  console.log('UserModifier: ', Math.random())
  const handleClick = () => {
    fetchUser(dispatch)
  }

  return (
    <div>
      <div>user: {state.user.name}</div>
      <button onClick={handleClick}>异步获取 user</button>
    </div>
  )
})
2
3
4
5
6
7
8
9
10
11
12
13
14
15
16
17
18
19
20
21
22
23
24
25
26
上面的代码我们只是对异步请求进行封装, 当我们点击按钮的时候就会发送一个异步的请求,然后渲染视图:
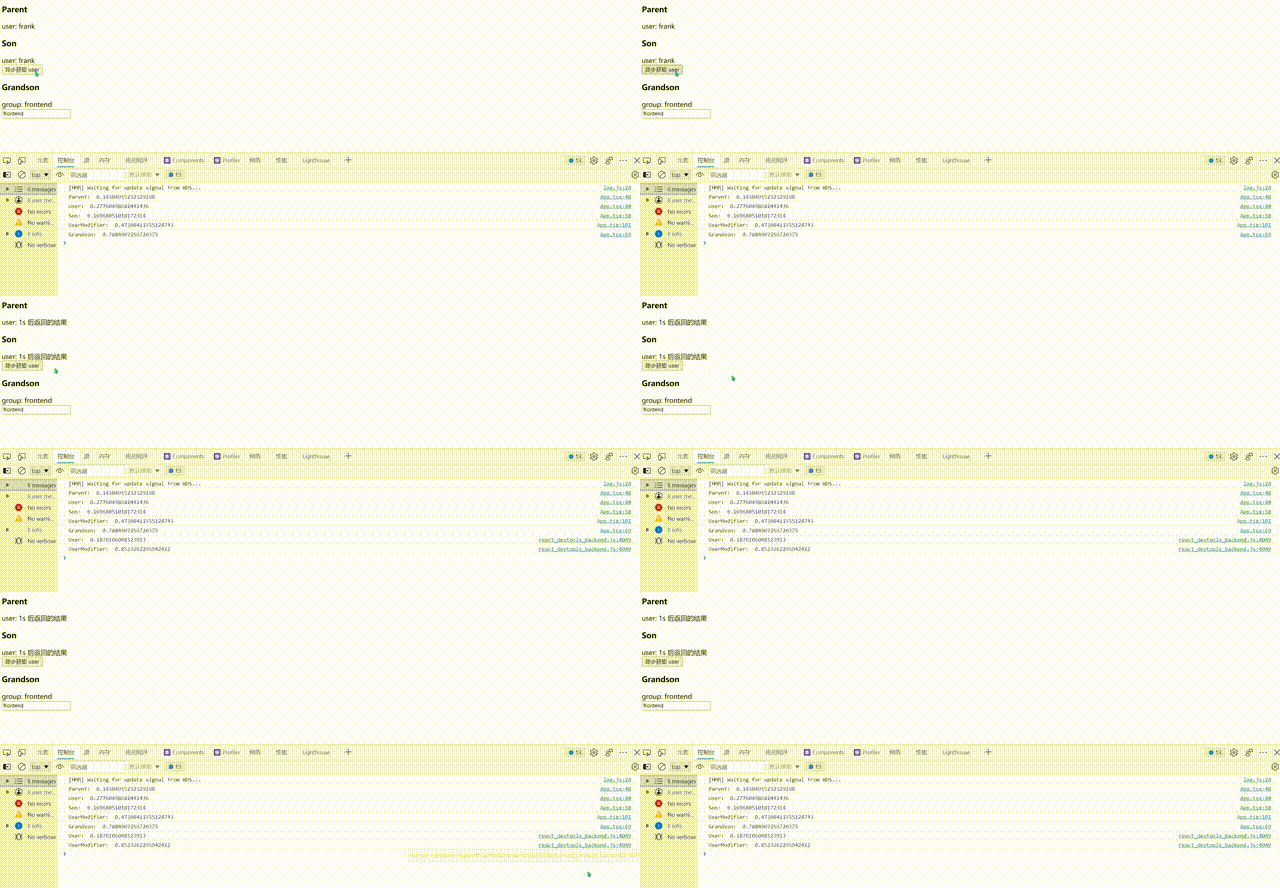
虽然目的实现了,但是从代码层面上看好像有些问题:
- 为什么我们的
fetchUser要获取dispatch? - 为什么是
fetchUser(dispatch)?如果我们能做到dispatch(fetchUser)是不是更符合语义,也更像同步 action?
为了实现 dispatch(fetchUser) 我们就需要对代码进行改造:
let prevDispatch dispatch
dispatch = fn => fn(prevDispatch)
2
这样新的 dispatch 就可以支持类似 dispatch(fetchUser) 的调用方式,这与同步 action 实现统一。
另一个问题也接踵而来:fetchUser 是一个异步请求,我们如何让 redux 支持异步 action?
参考上面的代码,我们可以在 react-redux 中对 dispatch 进行修饰:
// react-redux.js
let dispatch = action => setState(reducer(state, action))
// 支持异步 action
let prevDispatch = dispatch
dispatch = action => {
  if (typeof action === 'function') {
    return action(dispatch)
  }
  return prevDispatch(action)
}
2
3
4
5
6
7
8
9
10
我们先把 dispatch 用 prevDispatch 保存下来,然后修改原先的 dispatch。
我们判断 action 是不是一个函数,如果 action 不是函数,我们就认为是同步 action
执行 prevDispatch(action),和我们之前的代码一样。
重点在 action 是一个函数的时候,我认为此时的 action 是一个异步 action,所以我们
就执行一个异步 action 的函数,并且把 dispatch 作为异步 action 的参数传入。
注意:这里不能使用 prevDispatch。这是因为我们不知道异步 action 内部是否还嵌套另一个
异步 action,所以采用递归 的方式确保最终拿到的 action 是我们想要的。
事实上,上面的代码是 redux-thunk 的简化版。我们来看下 react-thunk 是实现(也就几行代码):
function createThunkMiddleware(extraArgument) {
  return ({ dispatch, getState }) => next => action => {
    if (typeof action === 'function') {
      return action(dispatch, getState, extraArgument)
    }

    return next(action)
  }
}

const thunk = createThunkMiddleware()
thunk.withExtraArgument = createThunkMiddleware

export default thunk
2
3
4
5
6
7
8
9
10
11
12
13
14
其中代码高亮部分就是我们前面实现的。
# middlewares
如果每次要拓展 dispatch 都需要在源码层面进行修改,那显然是违反了开闭原则。
我们先把前面的实现异步 action 的代码删除,我们先实现中间件功能,等下再通过中间件
实现异步 action。
下面是实现中间件的代码:
// react-redux.js
export const applyMiddleware = (...middlewares) => {
  return (reducer, initState) => {
    const store = createStore(reducer, initState)
    middlewares.reverse()
    // dispatch = store.dispatch
    middlewares.forEach(
      middleware => (dispatch = middleware(store)(dispatch)),
    )
    return Object.assign({}, store, { dispatch })
  }
}
2
3
4
5
6
7
8
9
10
11
12
下面我们先实现支持异步 action 的中间件,然后再回来解释 applyMiddlewares 的代码。
// middlewares/redux-thunk.js
export const reduxThunk = ({ dispatch, getState }) => {
  return next => action => {
    return typeof action === 'function'
      ? action(dispatch, getState)
      : next(action)
  }
}
2
3
4
5
6
7
8
现在我们再后头看 applyMiddleware 调用 middleware 部分。
(注意这里的 dispatch 是作为一个全局变量使用的。)
middlewares.forEach(middleware => (dispatch = middleware(store)(dispatch)))
我们把 store 传给 reduxThunk,reduxThunk 返回一个函数,该函数接收旧的 dispatch
返回新的 dispatch。
在 reactThunk 中新的 dispatch 为
action => {
  return typeof action === 'function'
    ? action(dispatch, getState)
    : next(action)
2
3
4
如果还看不懂的话,可以对比我们之前实现异步 action 的过程或者调试一下就明白了:
let dispatch = action => setState(reducer(state, action))
// 支持异步 action
let prevDispatch = dispatch // react-thunk 返回的函数的第一个参数 next 就是 prevDispatch
dispatch = action => {
  // 赋值过程相当于 applyMiddleware 中的 (dispatch = middleware(store)(dispatch))
  if (typeof action === 'function') {
    return action(dispatch)
  }
  return prevDispatch(action)
}
2
3
4
5
6
7
8
9
10
在 applyMiddleware 一开始就对 middlewares 进行反转(reverse) 目的是确保调用顺序是
从左到右。
至于在 applyMiddleware 中 dispatch 为全局变量与我们这里实现 createStore 有关。
# redux-promise
在实现 redux-promise 之前,我们还是照例来看一个例子:
// App.jsx
const fetchData = url => {
  return new Promise((resolve, reject) => {
    setTimeout(() => {
      resolve({ data: { name: '1s 后返回的结果' } })
      // reject({ name: 'error...' })
    }, 1000)
  })
}

const fetchUser = () =>
  fetchData('/user')
    .then(response => response.data)
    .catch({ name: 'unknown' })

const UserModifier = connect()(({ state, dispatch }) => {
  console.log('UserModifier: ', Math.random())
  const handleClick = () => {
    dispatch({
      type: 'updateUser',
      payload: fetchUser(),
    })
  }

  return (
    <div>
      <div>user: {state.user.name}</div>
      <button onClick={handleClick}>异步获取 user</button>
    </div>
  )
})
2
3
4
5
6
7
8
9
10
11
12
13
14
15
16
17
18
19
20
21
22
23
24
25
26
27
28
29
30
31
我们将 fetchData 的返回值作为 payload,但是我们知道这个返回的是一个
Promise,这就意味着我们需要修改我们的 reducer 让它支持 Promise
版的 payload。为了在不修改原有的代码基础上,我们可以通过如下方式实现:
// App.jsx
const UserModifier = connect()(({ state, dispatch }) => {
  console.log('UserModifier: ', Math.random())
  let prevDispatch = dispatch
  dispatch = action => {
    if (action.payload instanceof Promise) {
      action.payload
        .then(payload => {
          return dispatch({ ...action, payload })
        })
        .catch(error => {
          dispatch({ ...action, payload: error, error: true })
          return Promise.reject(error)
        })
    } else {
      return prevDispatch(action)
    }
  }

  // ...
})
2
3
4
5
6
7
8
9
10
11
12
13
14
15
16
17
18
19
20
21
其原理就是我们拦截 dispatch 的过程,判断 payload 是否为 Promise
而决定 dispatch 的方式。和 redux-thunk 一样,在 Promise.then
和 Promise.catch 中,我们需要使用递归 dispatch,这是避免嵌套 Promise。
我们可以将上面的操作封装成一个 middleware:
// middlewares/redux-Promise.js
export const reduxPromise =
  ({ dispatch }) =>
  next =>
  action => {
    if (action.payload instanceof Promise) {
      action.payload
        .then(payload => dispatch({ ...action, payload }))
        .catch(e => {
          dispatch({ ...action, payload: e, error: true })
          return Promise.reject(e)
        })
    } else {
      return next(action)
    }
  }
2
3
4
5
6
7
8
9
10
11
12
13
14
15
16
我们再次改造之前的代码:
// App.jsx
// 需要导入 reduxPromise
const store = applyMiddleware(reduxThunk, reduxPromise)(reducer, initState)

const UserModifier = connect()(({ state, dispatch }) => {
  console.log('UserModifier: ', Math.random())

  const handleClick = () => {
    dispatch({
      type: 'updateUser',
      payload: fetchUser(),
    })
  }

  return (
    <div>
      <div>user: {state.user.name}</div>
      <button onClick={handleClick}>异步获取 user</button>
    </div>
  )
})
2
3
4
5
6
7
8
9
10
11
12
13
14
15
16
17
18
19
20
21
# combineReducers
如果我们的 reducers 太多,但是 createStore 只能接收一个 reducer ,所以我们需要对多出来的 reducer
进行合并。
考虑下面的例子:
// App.jsx
const initState = {
  count: 0,
  todos: ['old todo'],
}

const countReducer = (state, { type }) => {
  switch (type) {
    case 'INCREMENT':
      return state + 1
    case 'DECREMENT':
      return state - 1
  }
  return state
}

const todosReducer = (state, { type, payload }) => {
  switch (type) {
    case 'ADD_TODO':
      return [...state, payload]
  }
  return state
}

const allReducers = combineReducers({
  count: countReducer,
  todos: todosReducer,
})

const store = applyMiddleware(reduxThunk, reduxPromise)(
  allReducers,
  initState,
)
2
3
4
5
6
7
8
9
10
11
12
13
14
15
16
17
18
19
20
21
22
23
24
25
26
27
28
29
30
31
32
33
我们合并两个 reducer,key 去获取相应的 state。
注意:传入 applyMiddleware对象的 key 要与获取的 state 相一致,不然就获取不到数据。
然后添加简单测试用例:
// App.jsx
const App = () => {
  return (
    <Provider value={store}>
      <Counter />
      <Todos />
    </Provider>
  )
}

const Counter = connect(state => ({
  count: state.count,
}))(({ count, dispatch }) => {
  console.log(`count: ${count}`)
  const handleIncrement = () => dispatch({ type: 'INCREMENT' })
  const handleDecrement = () => dispatch({ type: 'DECREMENT' })

  return (
    <div>
      <p>count: {count}</p>
      <button onClick={handleIncrement}>increment</button>
      <button onClick={handleDecrement}>decrement</button>
    </div>
  )
})

// 用来标识,别无它意
let id = 0
const Todos = connect(state => ({ todos: state.todos }))(
  ({ todos, dispatch }) => {
    console.log(`todos: ${todos}`)
    const handleAddTodo = () =>
      dispatch({ type: 'ADD_TODO', payload: `new todo ${id++}` })

    return (
      <div>
        <p>todos: {JSON.stringify(todos)}</p>
        <button onClick={handleAddTodo}>add todo</button>
      </div>
    )
  },
)
2
3
4
5
6
7
8
9
10
11
12
13
14
15
16
17
18
19
20
21
22
23
24
25
26
27
28
29
30
31
32
33
34
35
36
37
38
39
40
41
42
可以看到,我们在测试用例中使用 dispatch 与 单个 reducer 一摸一样。接下来,我们就来实现 combineReducers
// react-redux.jsx
export function combineReducers(reducers) {
  if (typeof reducers !== 'object') {
    return reducers
  }
  // 过滤不合法的 reducers
  const reducerKeys = Object.keys(reducers)
  const finalReducers = {}
  for (let i = 0; i < reducerKeys.length; i++) {
    const key = reducerKeys[i]
    // 只有是函数才认为是合法的 reducer
    if (isFunc(reducers[key])) {
      finalReducers[key] = reducers[key]
    }
  }

  const finalReducerKeys = Object.keys(finalReducers)
  return function combine(state, action) {
    const nextState = {}
    let hasChanged = false

    for (let i = 0; i < finalReducerKeys.length; i++) {
      const key = finalReducerKeys[i]
      const reducer = finalReducers[key]

      const previousStateForKey = state[key]
      const nextStateForKey = reducer(previousStateForKey, action)
      nextState[key] = nextStateForKey
      hasChanged = hasChanged || previousStateForKey !== nextStateForKey
    }
    hasChanged =
      hasChanged || finalReducerKeys.length !== Object.keys(nextState).length
    return hasChanged ? nextState : state
  }
}
2
3
4
5
6
7
8
9
10
11
12
13
14
15
16
17
18
19
20
21
22
23
24
25
26
27
28
29
30
31
32
33
34
35
combineReducers 返回的新的 reducer(函数)。
- 我们需要检验一下入参,过滤掉非法的
reducer。 - 新的
reducer会遍历所有的reducers映射到nextState中。 - 在执行过程中,我们会判断状态是否发生变化,如果状态没有发生变化,我们依旧返回旧的
state。
简单地验证我们写的 combineReducers:
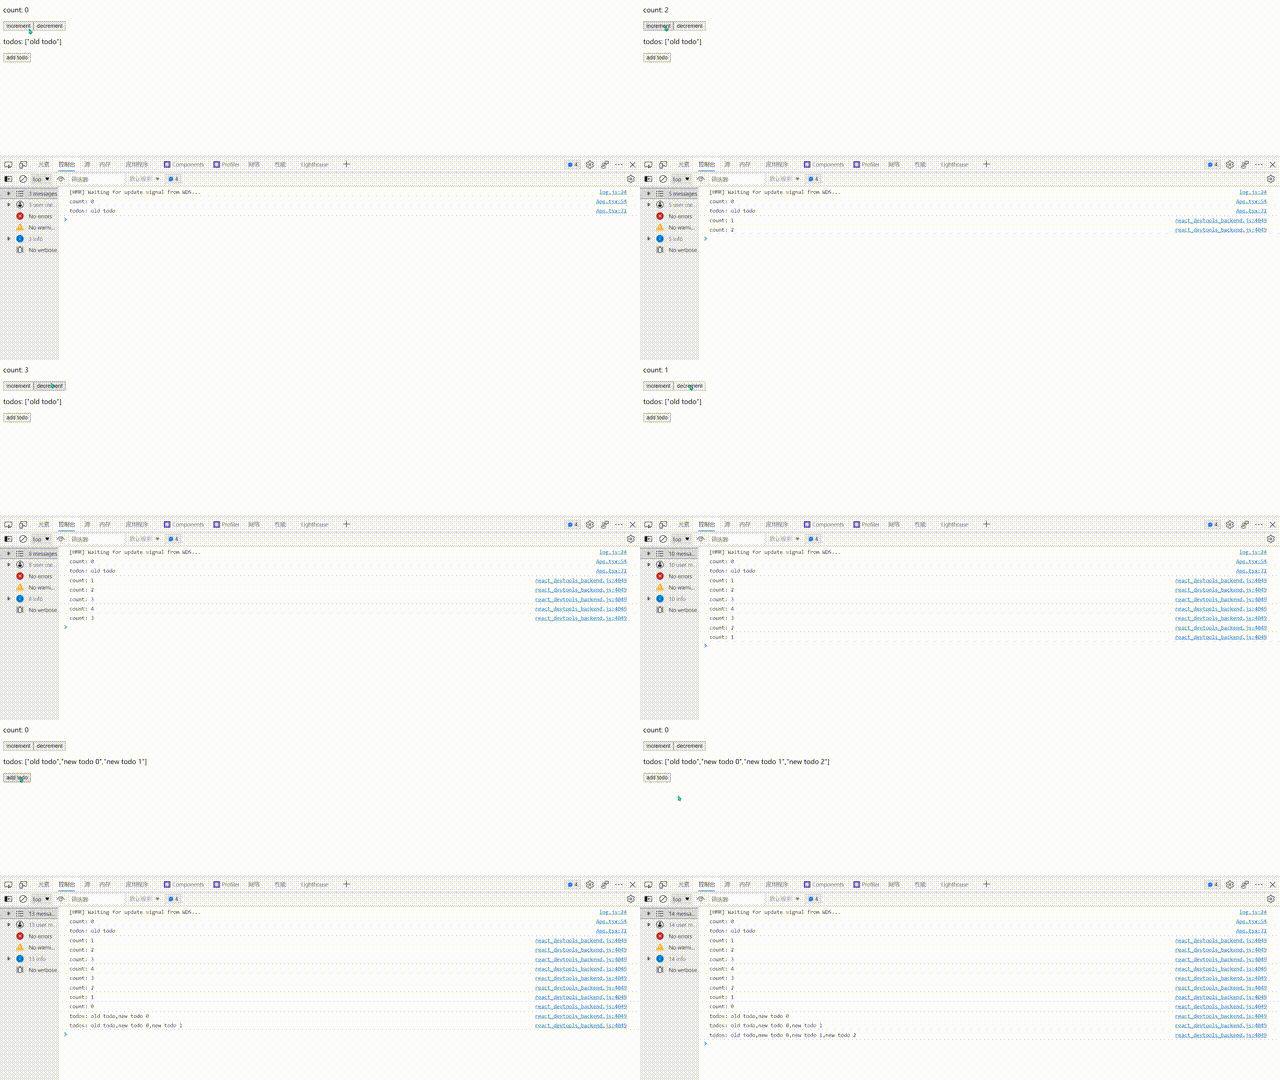
# Reference
# Appendix
# Connect 的由来代码部分
import { useState, useContext, createContext } from 'react'

/**
 * 基于旧的 `state` 创建新的 `state`,如果不需要改变原有的 `state`,则返回上一次的 `state`。
 * @param state
 * @param { type: string, payload: any }
 * @returns newState
 */
const reducer = (state, { type, payload }) => {
  if (type === 'updateUser') {
    return {
      ...state,
      user: {
        ...state.user,
        ...payload,
      },
    }
  }
  return state
}

const AppContext = createContext(null)
const App = () => {
  const [appState, setAppState] = useState({
    user: { name: 'frank', age: 18 },
  })

  const contextValue = { appState, setAppState }
  return (
    <AppContext.Provider value={contextValue}>
      <Parent />
      <Son />
      <Grandson />
    </AppContext.Provider>
  )
}

const Parent = () => (
  <section>
    <h3>Parent</h3>
    <User />
  </section>
)

const Son = () => (
  <section>
    <h3>Son</h3>
    <Wrapper />
  </section>
)

const Grandson = () => (
  <section>
    <h3>Grandson</h3>
  </section>
)

const User = () => {
  const contextValue = useContext(AppContext)
  return <div>user: {contextValue.appState.user.name}</div>
}

const createWrapper = Component => {
  const Wrapper = props => {
    const { appState, setAppState } = useContext(AppContext)
    const dispatch = action => {
      setAppState(reducer(appState, action))
    }
    return <Component {...props} dispatch={dispatch} state={appState} />
  }
  return Wrapper
}

const UserModifier = ({ dispatch, state }) => {
  const onChange = e =>
    dispatch({ type: 'updateUser', payload: { name: e.target.value } })

  return (
    <div>
      <input value={state.user.name} onChange={onChange} />
    </div>
  )
}
const Wrapper = createWrapper(UserModifier)

export default App
2
3
4
5
6
7
8
9
10
11
12
13
14
15
16
17
18
19
20
21
22
23
24
25
26
27
28
29
30
31
32
33
34
35
36
37
38
39
40
41
42
43
44
45
46
47
48
49
50
51
52
53
54
55
56
57
58
59
60
61
62
63
64
65
66
67
68
69
70
71
72
73
74
75
76
77
78
79
80
81
82
83
84
85
86
# React-Redux 雏形
// react-redux.jsx
import { createContext, useState, useEffect } from 'react'
export const AppContext = createContext(null)
export const store = {
  state: {
    user: { name: 'frank', age: 18 }, // 暂且进行简单的初始化
  },
  setState(newState) {
    store.state = newState
    store.listeners.forEach(fn => fn(store.state))
  },
  listeners: [],
  subscribe(fn) {
    store.listeners.push(fn)
    return () => {
      const index = store.listeners.indexOf(fn)
      if (index >= 0) store.listeners.splice(index, 1)
    }
  },
}

export const connect = Component => {
  return props => {
    const { state, setState } = store
    const [, update] = useState({})

    useEffect(() => store.subscribe(() => update({})), [])

    const dispatch = action => {
      setState(reducer(state, action))
    }
    return <Component {...props} dispatch={dispatch} state={state} />
  }
}

/**
 * 基于旧的 `state` 创建新的 `state`,如果不需要改变原有的 `state`,则返回上一次的 `state`。
 * @param state
 * @param { type: string, payload: any }
 * @returns newState
 */
const reducer = (state, { type, payload }) => {
  if (type === 'updateUser') {
    return {
      ...state,
      user: {
        ...state.user,
        ...payload,
      },
    }
  }
  return state
}
2
3
4
5
6
7
8
9
10
11
12
13
14
15
16
17
18
19
20
21
22
23
24
25
26
27
28
29
30
31
32
33
34
35
36
37
38
39
40
41
42
43
44
45
46
47
48
49
50
51
52
53
// App.jsx
import { AppContext, connect, store } from './react-redux'

const App = () => {
  return (
    <AppContext.Provider value={store}>
      <Parent />
      <Son />
      <Grandson />
    </AppContext.Provider>
  )
}

const Parent = () => {
  console.log('Parent: ', Math.random())
  return (
    <section>
      <h3>Parent</h3>
      <User />
    </section>
  )
}

const Son = () => {
  console.log('Son: ', Math.random())
  return (
    <section>
      <h3>Son</h3>
      <UserModifier />
    </section>
  )
}

const Grandson = () => {
  console.log('Grandson: ', Math.random())
  return (
    <section>
      <h3>Grandson</h3>
    </section>
  )
}

const User = connect(({ state }) => {
  console.log('User: ', Math.random())
  return <div>user: {state.user.name}</div>
})

// 将 Wrapper 修改为 UserModifier
// 同时,将原先的 UserModifier 的代码放在 createWrapper 的参数中。
const UserModifier = connect(({ dispatch, state }) => {
  console.log('UserModifier: ', Math.random())
  const onChange = e =>
    dispatch({ type: 'updateUser', payload: { name: e.target.value } })

  return (
    <div>
      <input value={state.user.name} onChange={onChange} />
    </div>
  )
})

export default App
2
3
4
5
6
7
8
9
10
11
12
13
14
15
16
17
18
19
20
21
22
23
24
25
26
27
28
29
30
31
32
33
34
35
36
37
38
39
40
41
42
43
44
45
46
47
48
49
50
51
52
53
54
55
56
57
58
59
60
61
62
