react - lifecycle
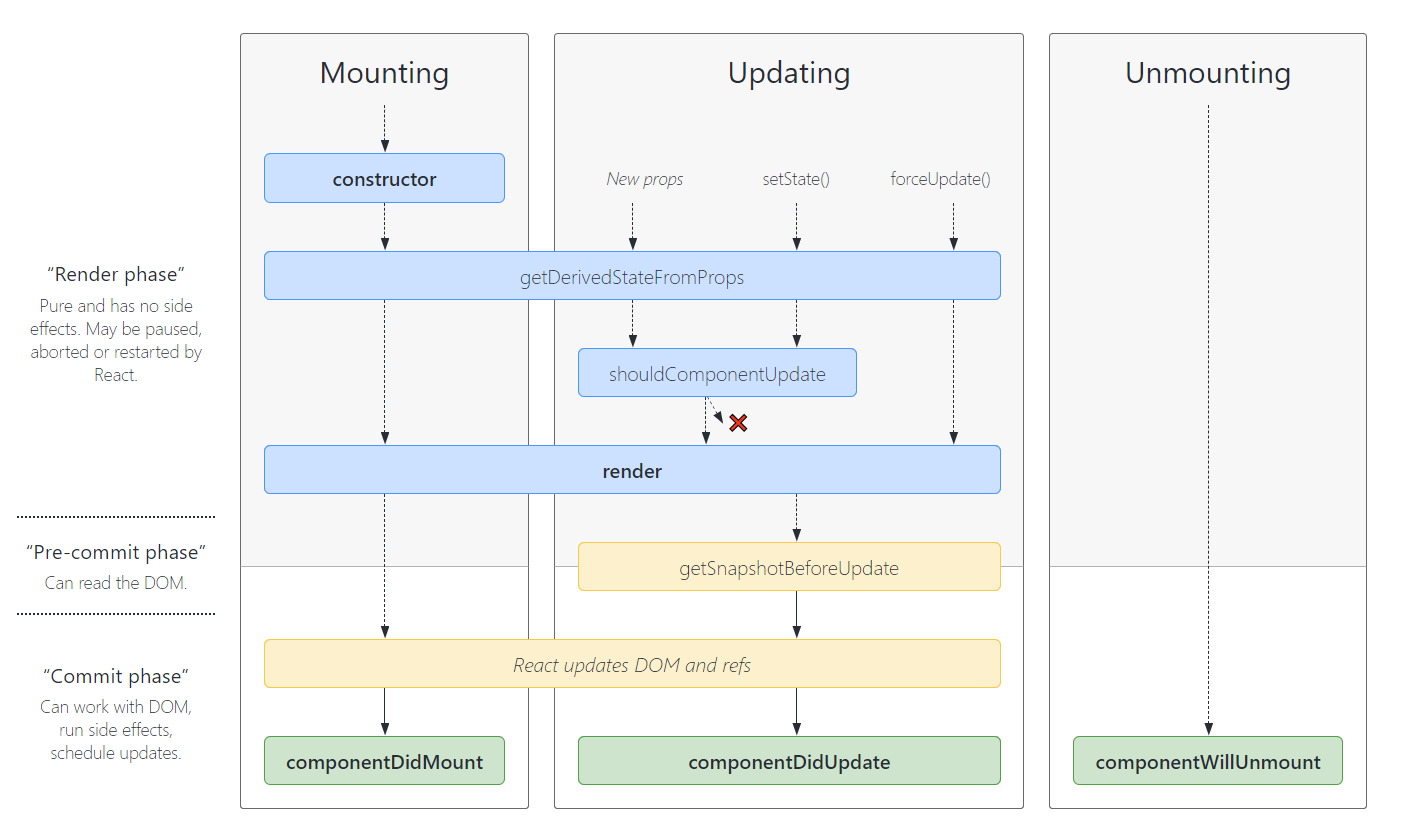
上面是 React 官方提供的 生命周期图示。从图中我们可以看到 React 的生命周期分为三个部分(Mounting, Updating, Unmounting)。
下面我们先搭建我们的测试用例:
import React, { Component } from 'react'

export default class App extends Component {
  constructor(props) {
    super(props)
    this.state = {
      count: 0,
    }
  }

  setCount = () => {
    this.setState({ count: this.state.count + 1 })
  }

  render() {
    return (
      <div>
        <p>当前技术为:{this.state.count}</p>
        <button onClick={this.setCount}>+</button>
      </div>
    )
  }
}
2
3
4
5
6
7
8
9
10
11
12
13
14
15
16
17
18
19
20
21
22
23
# Mounting
Mounting 阶段执行的是类的构造(constructor) (如果采用函数组件的话,就没有一个过程)。 然后就是渲染(render) 过程;渲染完成后进行挂载(componentDidMount)
现在我们来验证这个行为,修改我们的测试用例:
export default class App extends Component {
  constructor(props) {
    super(props)
    console.log('constructing...')
    this.state = {
      count: 0
    }
  }

  setCount = () => {
    this.setState({ count: this.state.count + 1 })
  }

  componentDidMount() {
    console.log('did mounted...')
  }

  render() {
    console.log('rendering...')
    return (
      <div>
        <p>当前技术为:{this.state.count}</p>
        <button onClick={this.setCount}>+</button>
      </div>
    )
  }
}
2
3
4
5
6
7
8
9
10
11
12
13
14
15
16
17
18
19
20
21
22
23
24
25
26
27
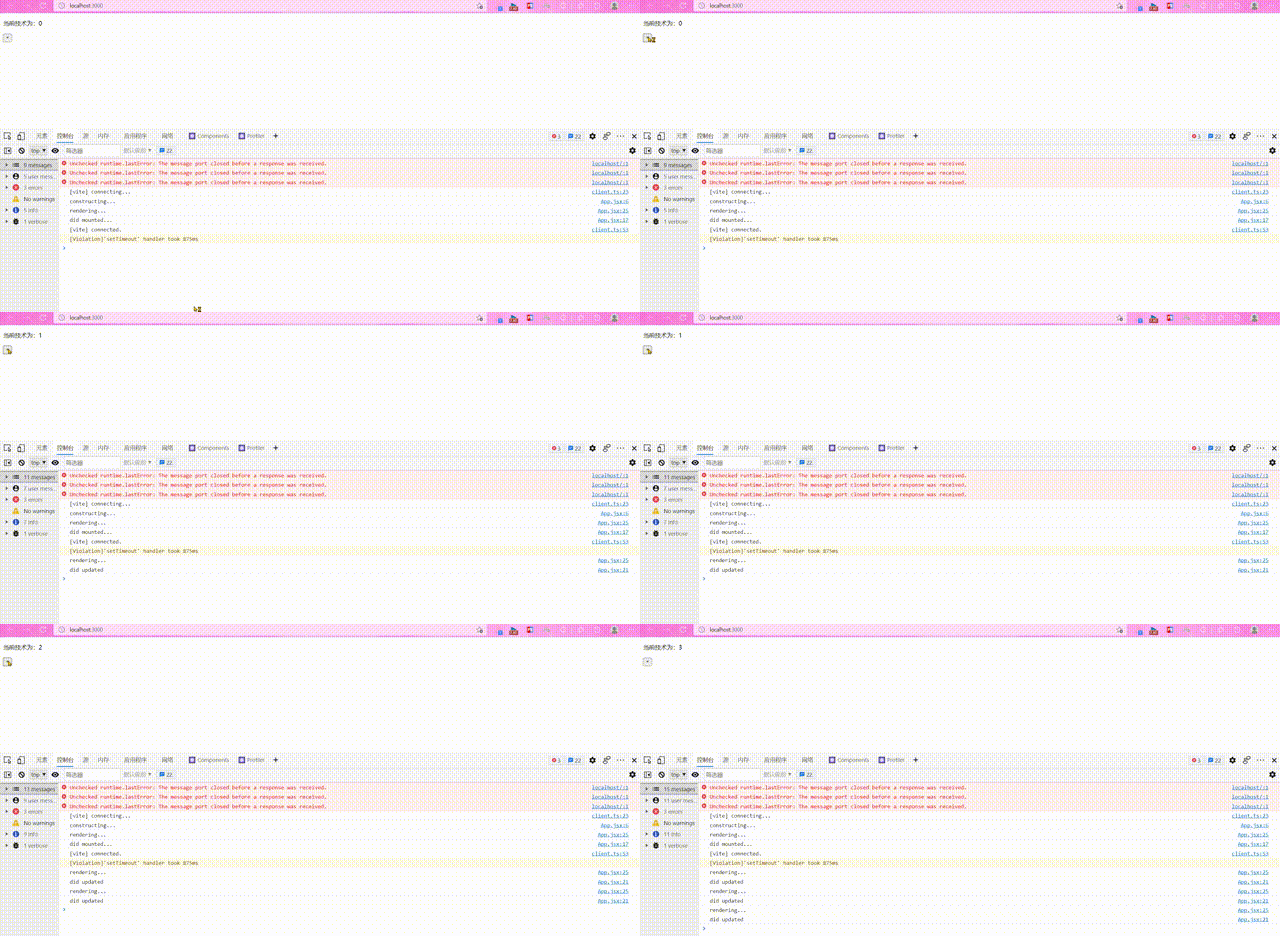
我们可以从控制台中看到:
# Updating
组件在更新的时候会再次执行渲染(render)函数,渲染完成后 会调用 componentDidUpdate。
下面我们来测试该行为,在上面代码的基础上,我们加上如下几段:
  componentDidUpdate() {
    console.log('did updated')
  }
2
3
可以看到每次我们点击 + 使状态发生变化的时候,就会执行
render 和 componentDidUpdate。
# Unmounting
卸载阶段比较简单,React 只会执行 componentWillUnmount。
# 父子组件的生命周期
# Mounting
- 调用父组件的
constructor方法。 - 调用父组件的
render方法。 - 调用子组件的
constructor方法。(这是因为在渲染父组件的时候发现存在子组件需要渲染) - 调用子组件的
render方法。 - 调用子组件的
componentDidMount方法。(这也很好理解,子组件要先于父组件挂载完成) - 调用父组件的
componentDidMount方法。
# Updating
- 调用父组件的
render方法。 - 调用子组件的
render方法。 - 调用子组件的
componentDidUpdate方法。 - 调用父组件的
componentDidUpdate方法。
注意:如果子组件采用的是 PureComponent 的方式,
则更行父组件的状态不会导致子组件更新。
# Unmounting
- 调用父组件的
componentWillUnmount方法。 - 调用子组件的
componentWillUnmount方法。
# 示例
// App.jsx
import React, { Component } from 'react'
import Parent from './Parent'

export default class App extends Component {
  state = {
    isShow: true
  }

  setIsShow = () => {
    this.setState({ isShow: !this.state.isShow })
  }

  render() {
    return (
      <div>
        <button onClick={this.setIsShow}>change show</button>
        {this.state.isShow ? <Parent /> : null}
      </div>
    )
  }
}

// Parent.jsx
import React, { Component } from 'react'
import Child from './Child'

export default class Parent extends Component {
  constructor(props) {
    super(props)
    console.log('parent: constructor')
  }

  state = {
    count: 0
  }

  setCount = () => {
    this.setState({ count: this.state.count + 1 })
  }

  componentDidMount() {
    console.log('parent: did mount')
  }

  componentDidUpdate() {
    console.log('parent: did update')
  }

  componentWillUnmount() {
    console.log('parent: will Unmount')
  }

  render() {
    console.log('parent: render')
    return (
      <div>
        <h1>parent</h1>
        <p>parent counter: {this.state.count}</p>
        <button onClick={this.setCount}>parent: +</button>
        <hr />
        <Child />
      </div>
    )
  }
}

// Child.jsx
import React, { Component, PureComponent } from 'react'

export default class Child extends Component {
  constructor(props) {
    super(props)
    console.log('child: constructor')
  }

  state = {
    count: 0
  }

  setCount = () => {
    this.setState({ count: this.state.count + 2 })
  }

  componentDidMount() {
    console.log('child: did mount')
  }

  componentDidUpdate() {
    console.log('child: did update')
  }

  componentWillUnmount() {
    console.log('child: will Unmount')
  }

  render() {
    console.log('child: render')
    return (
      <div>
        <h1>child</h1>
        <p>child counter: {this.state.count}</p>
        <button onClick={this.setCount}>child: +</button>
      </div>
    )
  }
}
2
3
4
5
6
7
8
9
10
11
12
13
14
15
16
17
18
19
20
21
22
23
24
25
26
27
28
29
30
31
32
33
34
35
36
37
38
39
40
41
42
43
44
45
46
47
48
49
50
51
52
53
54
55
56
57
58
59
60
61
62
63
64
65
66
67
68
69
70
71
72
73
74
75
76
77
78
79
80
81
82
83
84
85
86
87
88
89
90
91
92
93
94
95
96
97
98
99
100
101
102
103
104
105
106
107
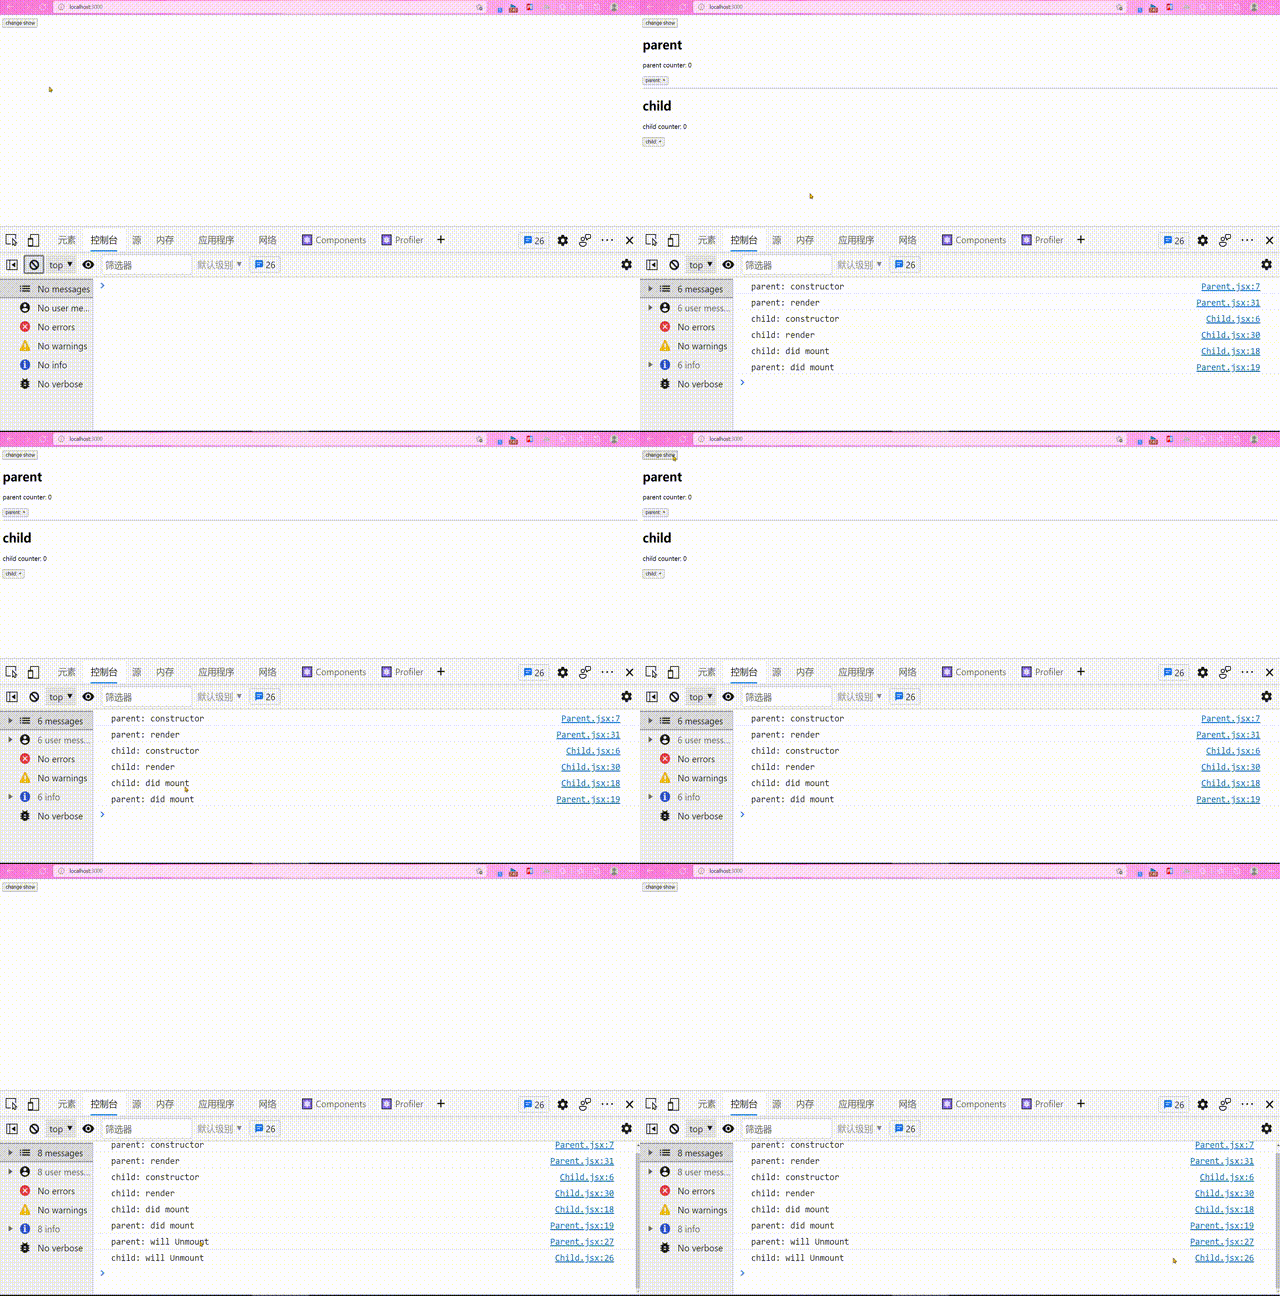
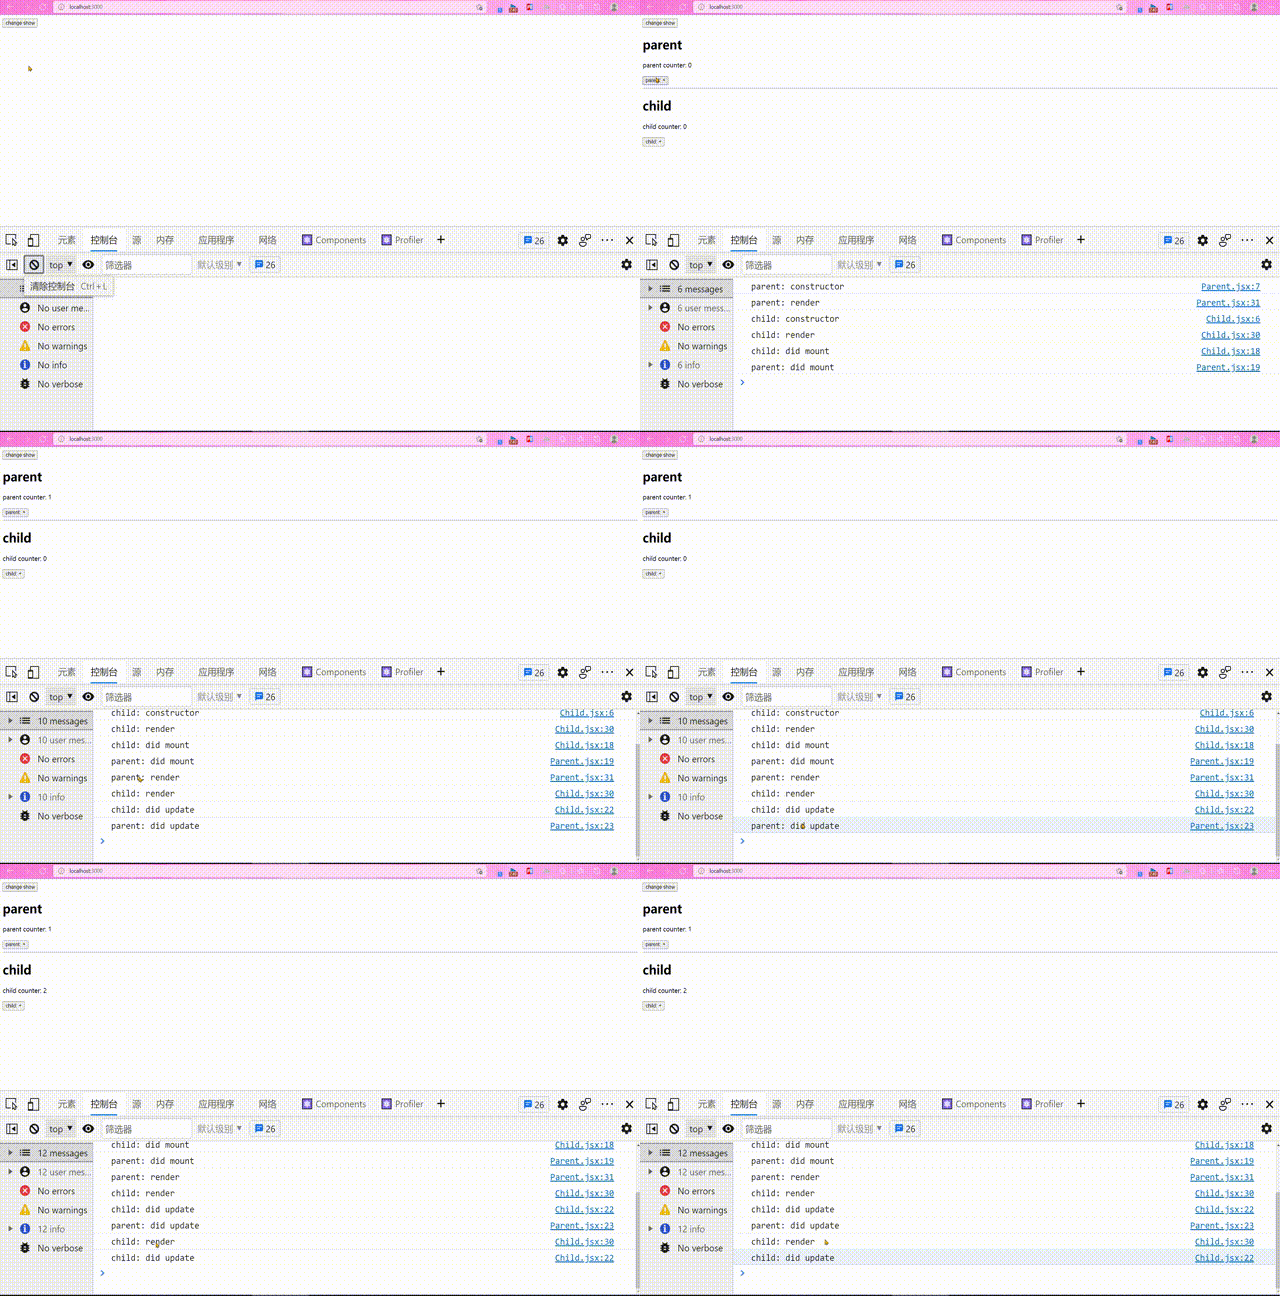
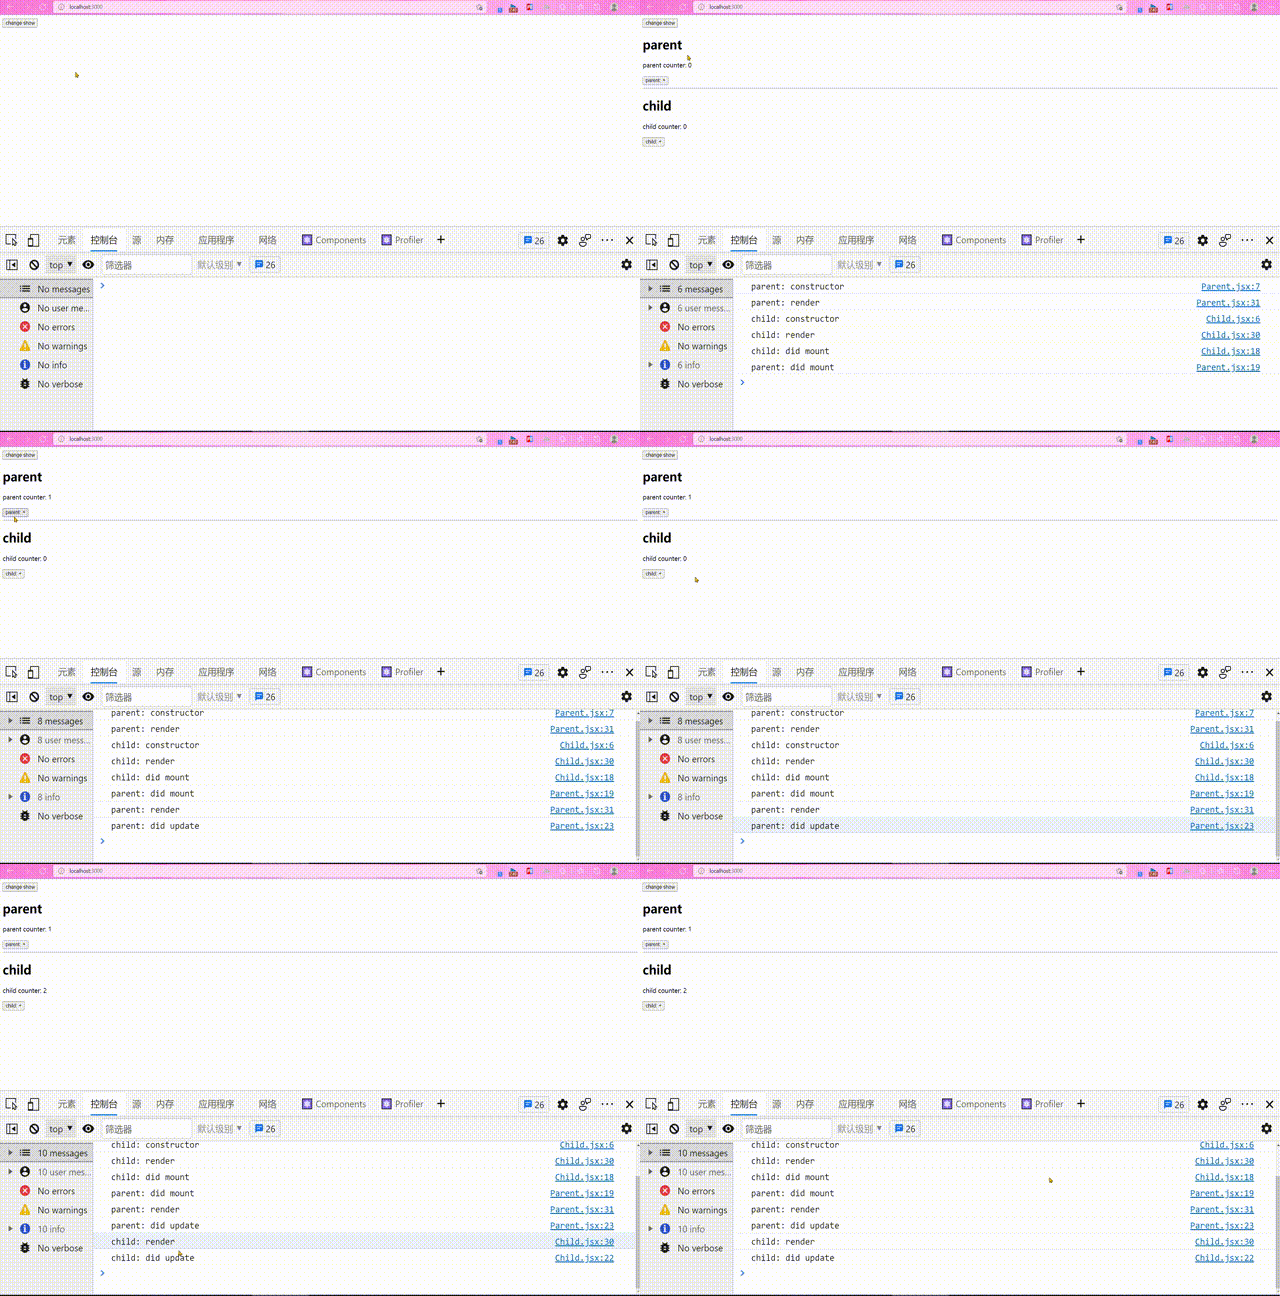
来看输出的结果:
未改变状态时生命周期函数的调用
改变状态时生命周期函数的调用
使用纯组件时生命周期函数的调用(需要将子组件的继承方式改为 PureComponent)
# 纯组件的原理
React 中的 PureComponent 继承于 Component,只是修改
了 shouldComponentUpdate 方法。对 props于 nextProps 和 state 于 nextState 进行 浅比较来控制组件是否更新。
下面是 PureComponent 的源码:
export default function PureComponent(props, context) {
  Component.call(this, props, context)
}

PureComponent.prototype = Object.create(Component.prototype)
PureComponent.prototype.constructor = PureComponent
PureComponent.prototype.shouldComponentUpdate = shallowCompare

function shallowCompare(nexProps, nextState) {
  return (
    !shallowEqual(this.props, nextProps) || !shollowEqual(this.state, nextState)
  )
}

// shollowEqual
export default function shallEqual(objA, objB) {
  // 从后面代码可以看出,对于两个对象的比较为这里的代码
  if (objA === objB) {
    return true
  }

  if (
    typeof objA !== 'object' ||
    objA === null ||
    typeof objB !== 'object' ||
    objB === null
  ) {
    return false
  }

  const keysA = Object.keys(objA)
  const keysB = Object.keys(objB)

  if (keysA.length !== keysB.length) {
    return false
  }

  // Test for A's keys different from B.
  for (let i = 0; i < keysA.length; i++) {
    if (!objB.hasOwnProperty(keysA[i]) || objA[keysA[i]] !== objB[keysA[i]]) {
      return false
    }
  }

  return true
}
2
3
4
5
6
7
8
9
10
11
12
13
14
15
16
17
18
19
20
21
22
23
24
25
26
27
28
29
30
31
32
33
34
35
36
37
38
39
40
41
42
43
44
45
46
